To complete this tutorial you will require the Input
/ Output module.
Note: This tutorial cannot be completed using LISCAD Lite.
Aim
The aim of this tutorial is to continue the examination of XSL Style Sheets, introducing the concept of Helper Files and the LISCAD XML User Interface.
In the previous tutorial, we saw how the "XSL Style Sheets - An Introduction" report style sheet was used to produce a HTML document that displayed a list of all the point identifiers, codes and descriptions in a SEE database. In this tutorial we will further develop the Style Sheet to get more Point information into the report, such as the Coordinates, Scale Factors and Grid Convergence.
Before you begin
This tutorial builds on the previous tutorial "XSL Style Sheets - An Introduction". If you have not familiarized yourself with the previous tutorial, it would be wise to do this before attempting this one, since knowledge of the concepts introduced there are assumed in this tutorial.
Press this button to install the required data files.
- Understanding the Attribute Levels of Objects
Open the "REP XSL User Interface Tutorial.xsl" file in your style sheet editor, in this case Cooktop.
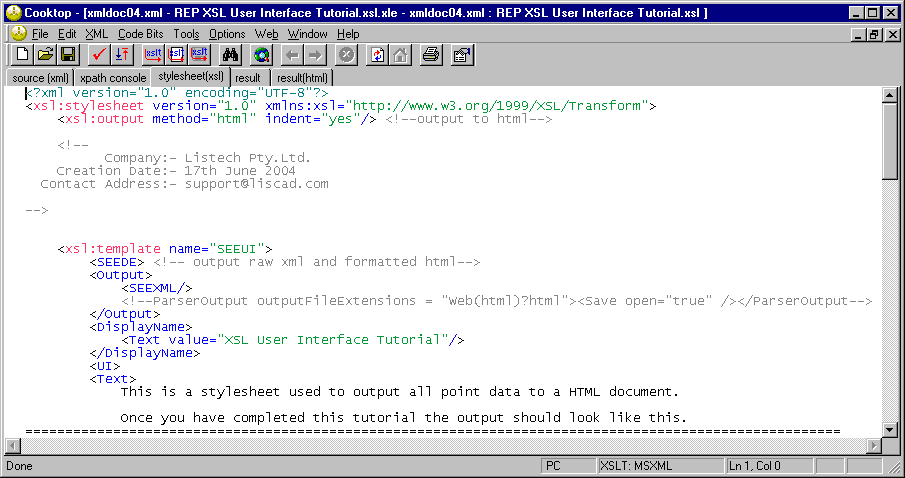
In the previous tutorial, we saw how the <Operation....> element was used to extract all Point data in the SEE database, and how setting the attributes attribute to "core" was enough to return us the ID, Code and Description for those Points. How did we know that "core" returned those attributes, and what other attributes are available for us to report on? In the tutorial "LISCADXML - Structure and Syntax", we saw that there is some comprehensive documentation in the form of a html document. This file is called "LISCADXML-SEEDB_1.0.html"
You can find the "LISCADXML-SEEDB-1.0.html" file on the LISCAD installation CD in the "XML Documentation" folder, or all the XML related documentation can be downloaded from the LISCAD web site at http://www.listech.com/liscad/library.aspx?library=miscellaneous.
Open the "LISCADXML-SEEDB-1.0.html" file by double clicking on it. It should open automatically in your default web browser. This file is full of links between the elements in the LISCADXML file making it quicker and easier to locate the information.
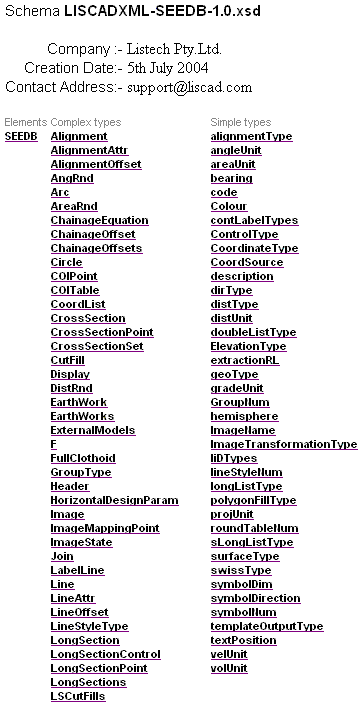
Click on the Complex Type Point link.
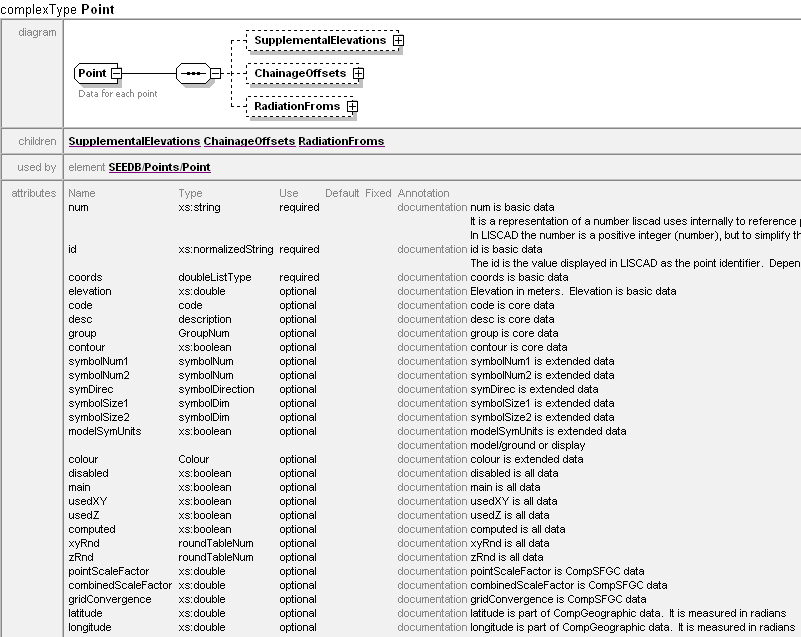
This has taken us to the documentation for the Point Type, which the element Point belongs to. We find here a complete listing of all the possible attributes for the Point element. The annotation section on the right is what we are after here. In the previous tutorial, we extracted the id, code and desc attributes. We can see that id is "basic" , and code and desc are "core". Going down the list, we can see that some attributes are classed as "extended" and some "all".
The four attribute levels thus are
- basic
- core
- extended
- all
Earlier, we chose the "core" set of attributes, but we also got all the "basic" set as well. This is because when you choose a level, you automatically get the level or levels below it as well. Hence if you select "all" as the attribute level, you would get all the attributes for the Point element, down the list to zRnd in this case.
We are looking to extract the coordinates of the Point (Easting, Northing and Elevation), Point Scale Factor, Combined Scale Factor and Grid Convergence for the Points. Note that the coords and elevation attributes are of a "basic" level, so asking for all "core" attributes will automatically get this data. You can check this by opening the "LISCADXML Tutorial.xml" file from the previous tutorial in your web browser.
Scroll down to the <Points > elements.
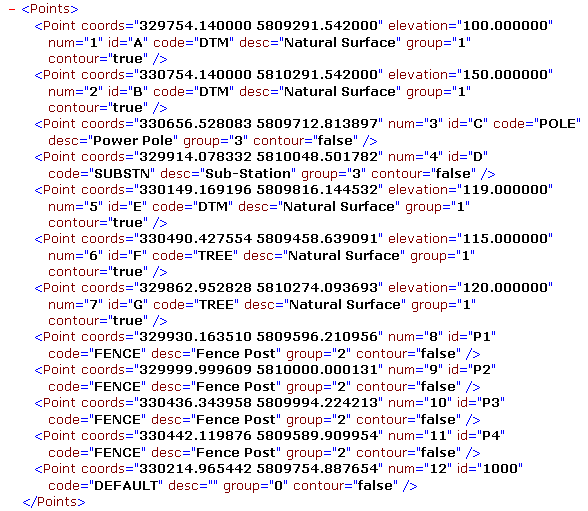
See how we already have the coords and elevation extracted. Note though that all the coordinates are contained with the coords attribute, there is no attribute for easting and northing. The coords attribute stores all coordinates, in the format easting space northing. We will have to separate the easting and northing out of the coords attribute, but firstly, we need to get all the attributes we need extracted.
- Requesting Computed Attribute Data
The Scale Factor and Grid Convergence attributes though, aren't there already, and indeed, noting the annotation section, we see that they are not even included in "all" data. They actually belong to "CompSFGC" data.
Is this another attribute level?
The answer is no, we can't set the value of the attributes attribute for the <Operation....> element in our style sheet to this, since it is not a valid value for the attributes attribute. Note that "CompSFGC" is the request that we need to send to get LISCAD to return the scale factors and grid convergence we require for our task.
The reason that the point scale factor and grid convergence are not part of the point attributes is because the LISCAD data base does not store this information as an attribute against each point. This information is computed by LISCAD when it is required. So we need to make a request to LISCAD to compute this information when it exports the point data to the LISCADXML file as we need it for this report.
You may notice that the <Operation....> element is not part of the LISCADXML-SEEDB-1.0 Schema we have opened. To see what is valid syntax using the <Operation....> element, we need to open another Schema which the LISCAD development team created, which was mentioned in the previous tutorial, allowing the user to create their own User Interface (UI) for XML data reporting. This schema is called the LISCADXML-SEEDE-1.0 Schema, DE standing for Directive Element.
Close the LISCADXML Tutorial.xml document, and close the LISCADXML-SEEDB-1.0 Schema we have opened.
You can find the "LISCADXML-SEEDE-1.0.html" file on the LISCAD installation CD in the "XML Documentation" folder, or it can be downloaded from the LISCAD web site at http://www.listech.com/liscad/library.aspx?library=miscellaneous.
Open the "LISCADXML-SEEDE-1.0.html" file by double clicking on it. It should open automatically in your default web browser. This file contains the instruction set to get selected and additional information from the LISCAD data base.
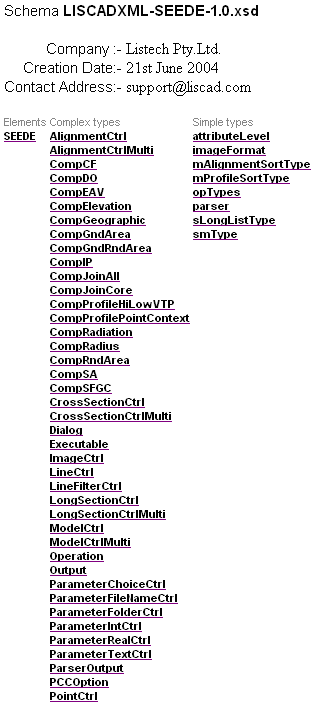
Click on the Operation link.
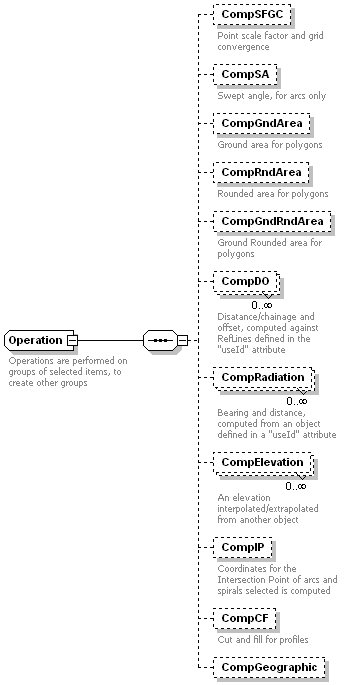
We can see that a child element of this Operation element is the CompSFGC element. We shall come back to this, but first note that the attributes attribute is of type attributeLevel.

Return to the top of the document and click on the simple type attributeLevel link.

This information about the attributeLevel Type explains the options available to us when setting values in the attributes attribute of the Operation element. The only options are "basic", "core", "extended" and "all". No "CompSFGC" here.
Never mind, we saw briefly that the Operation element had a child element CompSFGC.
Navigate to the information about CompSFGC.
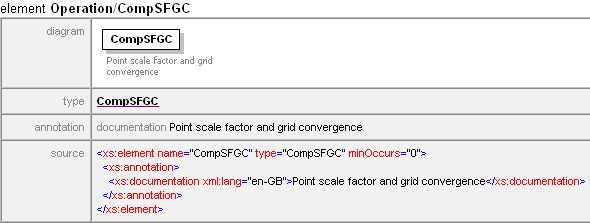
This tells us that this element will output the Point scale factor and grid convergence. That is what we are looking for.
Close the Schema documentation and return to the XSL editor.
At the point in the style sheet where the <Operation..../> element is positioned, edit the file by including the <CompSFGC/> in the position shown below.
<Operation opType="allPoints" setID="1" attributes="core">
    <CompSFGC/>
</Operation>
Save the file. What we have now done is ask for more data to be extracted into the LISCADXML file. To see that this is so, we shall open the LISCADXML file after running this edited style sheet through our SEE database file.
In LISCAD, use File/Open to open the "LISCADXML Tutorial.see" file.
Select Tasks/Utilities, then Report/XSL User Interface Tutorial. If this option is not available in the Reports Menu, use the Add/Remove function to add it to the list.
Enter the following file name.
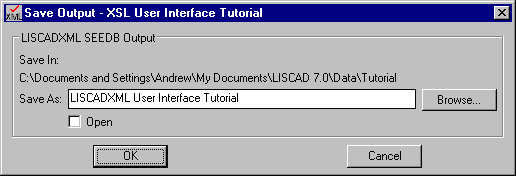
Click OK.
In Windows Explorer, navigate to where the LISCADXML User Interface Tutorial.xml file has been created.
Open this file in your Web browser. You will see the Points Report unchanged from the previous tutorial.
Within the web browser, click View/Source.
The XML data is now displayed in Notepad. This is hard to read, so comment out the second line, the reference to the style sheet, as so...
<!--?xml-stylesheet type="text/xsl" href="C:\Documents and Settings\All Users\Application Data\LISCAD\7.x\ REP XSL User Interface Tutorial.xsl"?-->
Save the file, close Notepad and refresh the Web browser.
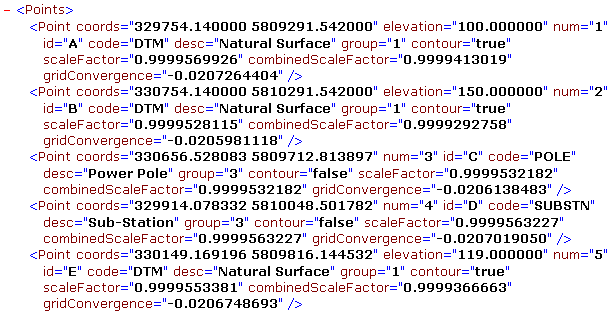
Scroll down to the <Point..../> elements and note that we now have some more attributes extracted - scaleFactor, combinedScaleFactor and gridConvergence.
Close the web browser and return to the XSL editor.
There is a lot of data that LISCAD computes when it needs it. So the <Operation..../> element can contain several different computations that will instruct LISCAD to compute and output the relevant data to the LISCADXML file if and when it is required.
This information has to be expressly requested. If LISCAD were to compute and output all the information to the LISCADXML file every time one was created, it would take longer to create the file and you would end up with a much larger LISCADXML file which would also be more difficult to read.
We now have all the data in the LISCADXML file, so we can output these new attributes to the HTML document we are trying to create.
Firstly, edit the second HTML table element by adding some new column headers to the table to display the new data. Also we will add some comments after the table to explain what the acronyms in the headings stand for. Note that the   represents a Tab character in html.
This is what the edited code should look like after making the changes.
</table> <br/><br/><br/> <table border="1"> <tbody> <tr> <th>Point</th> <th>East</th> <th>North</th> <th>Elev.</th> <th>Code</th> <th>Desc.</th> <th>P.S.F.</th> <th>C.S.F.</th> <th>G.C.</th> </tr> <xsl:for-each select="/SEEDB/Points/Point"> <xsl:sort select="./@id" data-type="text"/> <xsl:apply-templates select="."/> </xsl:for-each> </tbody> </table> <p>P.S.F. - Point Scale Factor  C.S.F. - Combined Scale Factor  G.C. - Grid Convergence</p> </body> </html> </xsl:template>
- Using Helper Style Sheets to Format the Data
So now the columns have been created, we need to populate them. We return to the problem of how to extract the Easting and Northing from the coords attribute. This is where Helper style sheets can assist you. Helper style sheets can be called to perform tasks that are commonly required. The system comes with a set of Helper style sheets, but you can also write your own to handle functionality that you regularly use.
Within the LISCAD user folder, where the style sheets are located, there are some style sheets prefixed with "HLP". We call these style sheets "Helper Files". These are style sheets that are designed to be referenced by other style sheets in order to do functions that may be required universally.
Save the style sheet and from within the XSL editor, open the helper file "HLP SEEUtilities01.xslt".
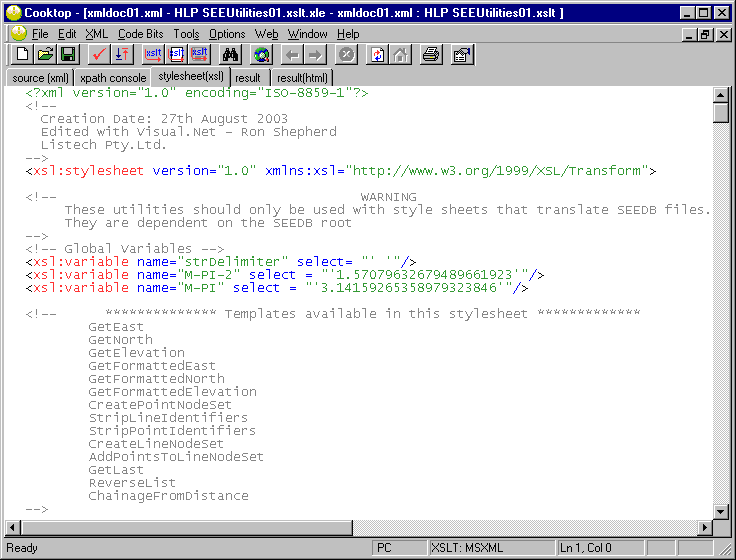
This style sheet consists of a series of templates. These templates can be thought of as routines or functions which other style sheets can call.
The templates we are interested in are called GetFormattedEast, GetFormattedNorth and GetFormattedElevation.
Scroll down the file till you find the template GetFormattedEast.

All these templates are well documented as to what they do and how to call them. This template takes two parameters, as is controlled by the <xsl:param..../> element. The first element is the string that is the value of the coords attribute, i.e. the "East North" string. The second parameter specifies the way we want the coordinates to be formatted. If we want the coordinates to be expressed to three decimal places, then we would pass the string '0.000' to this parameter.
The GetFormattedNorth and GetFormattedElevation templates are similar to this template, though there is an extra parameter available in the GetFormattedElevation template, which allows us to specify some text if there is no elevation to be found in the value of the coords attribute.
Make a note of the Sample code found commented here, and return to the style sheet we are editing.
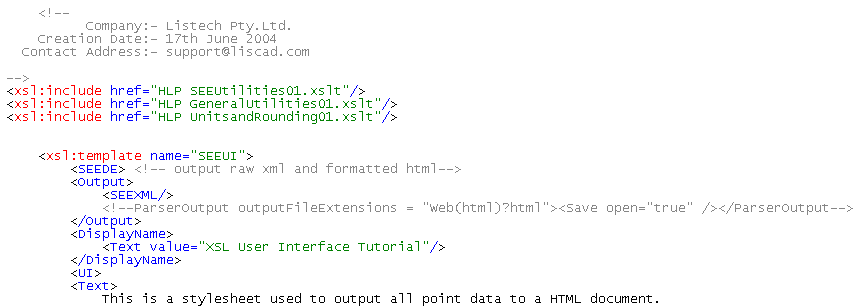
Scroll up to the top of the style sheet and just before the first <xsl:template.../> element, add the following lines...
<xsl:include href= "HLP SEEUtilities01.xslt"/>
<xsl:include href= "HLP GeneralUtilities01.xslt"/>
<xsl:include href= "HLP UnitsandRounding01.xslt"/>
The reason we need to add two other helper files besides "HLP SEEUtilities01.xslt" is because this helper file also calls the other two helper files as well. If you wish you can open up these other helper files and have a look at what functionality they contain.
Thus...
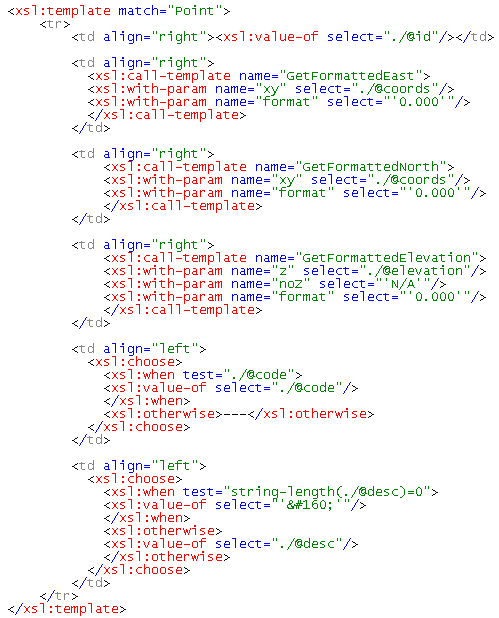
Scroll down to the template that matches on "Point". Insert the following code after the <td> element, or table data element in HTML, that populates the Point column.
Note: XSL language is case sensitive, so be careful when you type code in.
<td align="right"/>
    <xsl:call-template name="GetFormattedEast"/>
    <xsl:with-param name="xy" select="./@coords"/>
    <xsl:with-param name="format" select="'0.000'"/>
    </xsl:call-template>
</td>
The first line here creates another table data element, which will be the easting coordinate, aligned right.
The next line calls the GetFormattedEast template, which will output the formatted easting in the coords attribute for the <Point..../> element being processed by the template to three decimal places.
Add a similar block of code to call the GetFormattedNorth template for the next column.
<td align="right"/>
    <xsl:call-template name="GetFormattedNorth"/>
    <xsl:with-param name="xy" select="./@coords"/>
    <xsl:with-param name="format" select="'0.000'"/>
    </xsl:call-template>
</td>
Add a similar block of code to call the GetFormattedElevation template for the next column, including the parameter for if there is no elevation for the Point. In this case we will pass the text "N/A" out.
<td align="right"/>
    <xsl:call-template name="GetFormattedElevation"/>
    <xsl:with-param name="z" select="./@elevation"/>
    <xsl:with-param name="noZ" select="'N/A"/>
    <xsl:with-param name="format" select="'0.000'"/>
    </xsl:call-template>
</td>
Thus the entire template code looks like this...
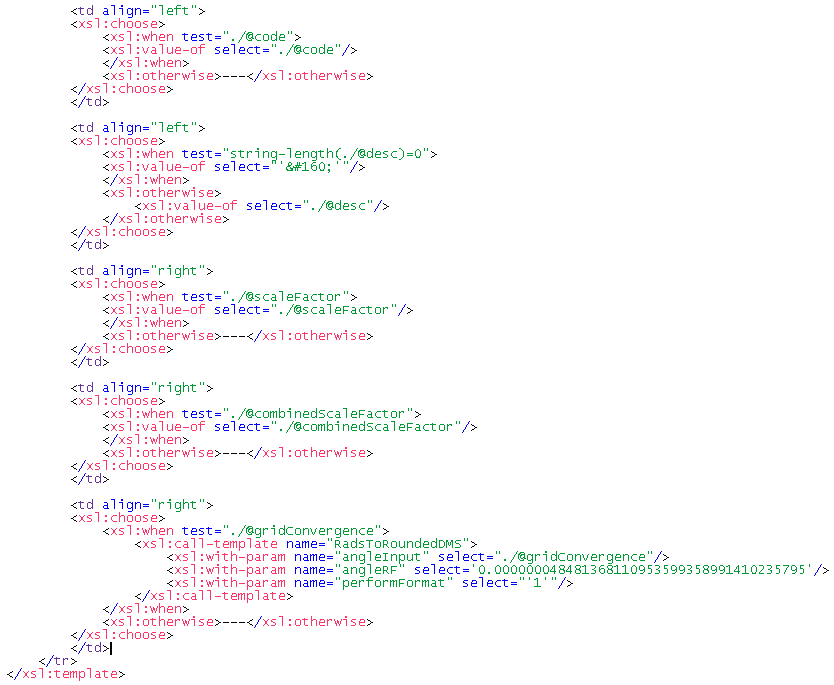
Now we need to add the Scale Factors and Grid Convergence data. We are placing these in the columns after the Description data, so just before the </tr> line at the end of the template.
The scale factors code is similar to what we saw with the code attribute.
<td align="right">
<xsl:choose>
    <xsl:when test="./@scaleFactor">
        <xsl:value-of select="./@scaleFactor"/>
    </xsl:when>
    <xsl:otherwise>---</xsl:otherwise>
</xsl:choose>
</td>

<td align="right">
<xsl:choose>
    <xsl:when test="./@combinedScaleFactor">
        <xsl:value-of select="./@combinedScaleFactor"/>
    </xsl:when>
    <xsl:otherwise>---</xsl:otherwise>
</xsl:choose>
</td>
We have another problem with the values being extracted into the XML data in relation to the Grid Convergence attribute. If you review the XML data from before, you will see that the Grid Convergence values are in radians. Ideally we would prefer this to be output in Degrees Minutes and Seconds. To do this, we have another Helper File template available to us. This one is called RadsToRoundedDMSS in the "HLP UnitsandRounding01.xslt".
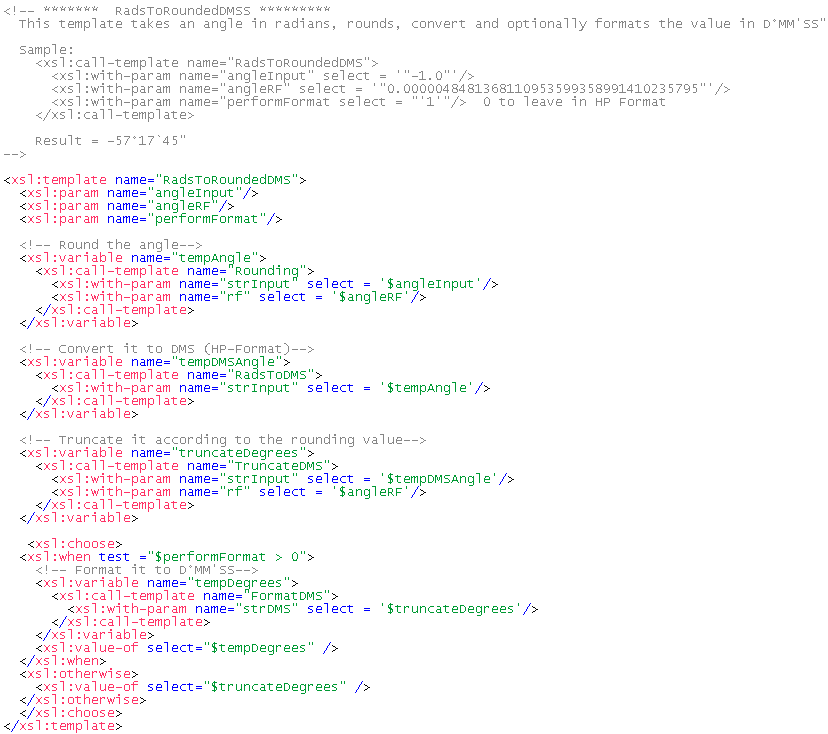
This function takes three parameters. The first one is the actual radian value to be passed into it. The second one is the rounding factor that the resultant angle is to be expressed by. This rounding factor is passed in in radian units. Hence, if you wish to have the angle expressed to the nearest one second, you would pass in the value of 1 second of arc in radians which is 0.0000048481368110953599358991410235795. The third parameter is a flag as to whether to express it with the ° degree symbol ,' minute symbol, " second symbol or just in HP format which is DD.MMSS. Passing in a 0 leaves it in HP format.
We shall express the Grid Convergence to the nearest 1/100 of a second and display the ° degree symbol, ' minute symbol and " second symbol.Insert the following code block to add the Grid Convergence.
<td align="right">
<xsl:choose>
    <xsl:when test="./@gridConvergence">
        <xsl:call-template name="RadsToRoundedDMS">
            <xsl:with-param name="angleInput" select="./@gridConvergence"/>
            <xsl:with-param name="angleRF" select='0.000000048481368110953599358991410235795'/>
            <xsl:with-param name="performFormat" select="'1'"/>
        </xsl:call-template>
    </xsl:when>
    <xsl:otherwise>---</xsl:otherwise>
</xsl:choose>
</td>
Thus the template code ends like this...
- Generate the Report
To be able to test what we have just done we need to get the dialog box to prompt us for the name of the output file we want to create. The statement to add this to the dialog is already in the style sheet but has been commented out.
Go to the top of the style sheet to the <SEEDE> element. In this section you will find a <ParserOutput...> statement that has been commented out. Remove the comments.
<ParserOutput outputFileExtensions="Web(html)?html"> <Save open="true"/> </ParserOutput>
Save the style sheet.
Within LISCAD, Select Tasks/Utilities, then Report/XSL User Interface Tutorial.
Enter the following into the prompts.
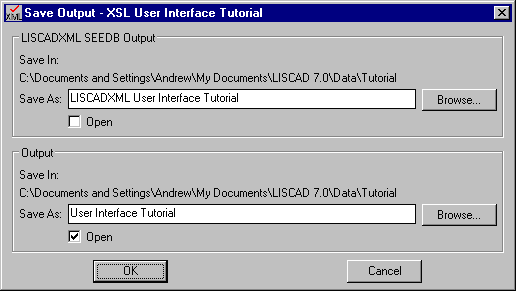
This will create a "LISCADXML User Interface Tutorial.xml" file and a "User Interface Tutorial.html" file which will be opened automatically in your default Internet browser application.
Click OK.
The new Points Report should be displayed with our new data.
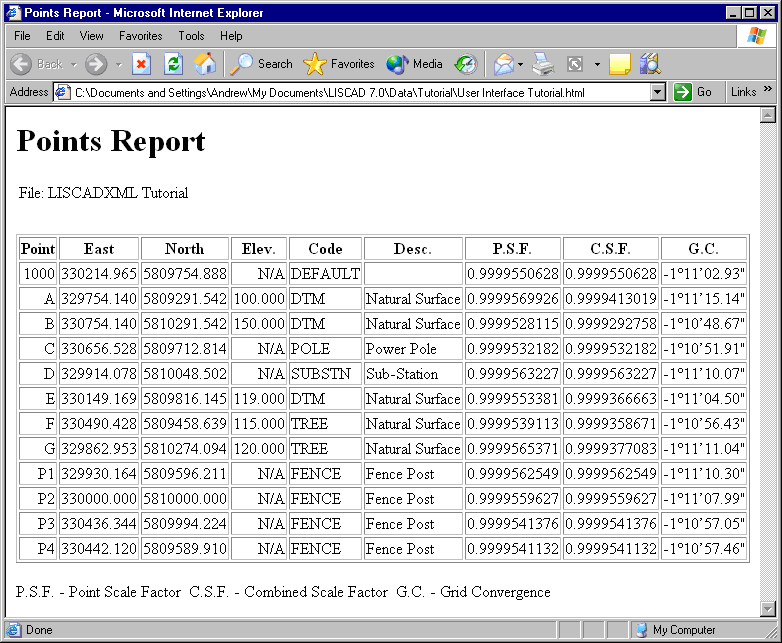
Note how the Grid Convergence is displayed with the appropriate symbols to the nearest 1/100 th of the second.
- Formatting Numbers Using XSL
As a final modification, let's say we wish to display the Scale Factors to seven decimal places only. The XSL language has its own function which we can use to easily do this, the format-number function. This function is of the form..
format-number(number,'format')
Go back into the XSL editor and back to the template which matches on "Point", at the bottom of the file. In the area where the scale factors are being output, make the following change to the <xsl:value-of select=....> statements.
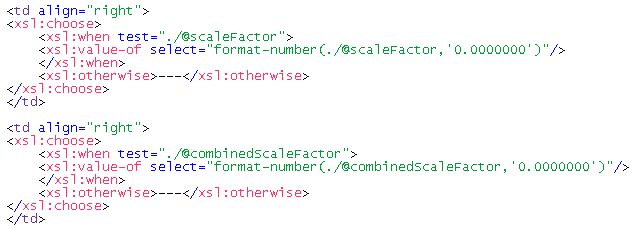
The string '0.0000000' tells the parser the display the numbers rounded to 7 decimal places.
Save the style sheet and reproduce the Report though LISCAD again.
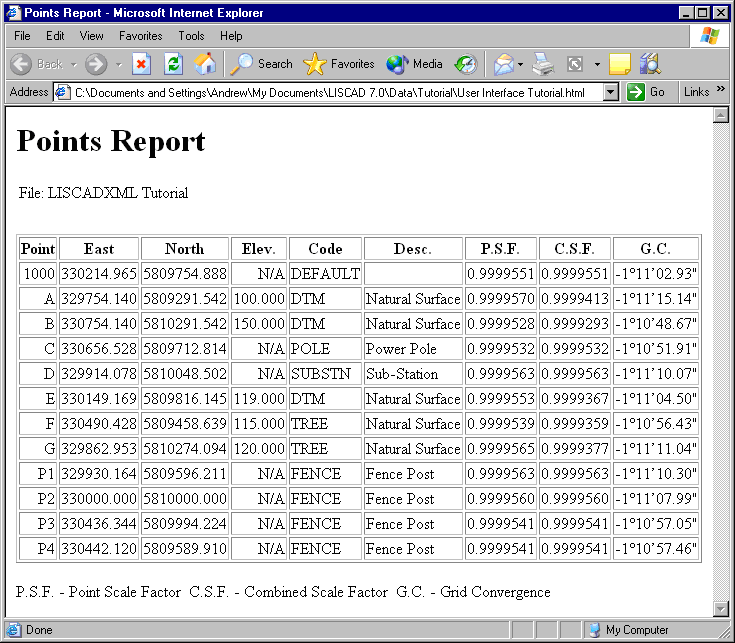
This tutorial has provided a continuing introduction to XSL Style sheets. We have learnt how to get extra data output for <Point....> elements. We are still getting all Points out though, what about only getting certain points instead?
In the next tutorial "XSL Style Sheets - Interface Controls" we will continue to look at what style sheets are capable of, focusing particularly on the LISCAD interface dialog and how we can add controls which allow us to filter out what we extract to XML even further.
Conclusion
You have now completed the Tutorial on the XSL Style Sheets - User Interface and Helper Files and should have a good understanding of the following:
- Editing Style Sheets through an XSL editor like Cooktop;
- Looking up LISCADXML User Interface information through the LISCADXML-SEEDE-1.0 Schema;
- Attribute Levels for LISCADXML elements;
- How to request that computed data is to be output;
- Helper Files and how to utilize them.