To complete this tutorial you will require the Input
/ Output module.
Note: This tutorial cannot be completed using LISCAD Lite.
Aim
The aim of this tutorial is to introduce the user to XSL Style Sheets.
XSL is an acronym for eXtensible Stylesheet Language. It is the language that is used to display data in an XML document in a definable way.
In previous tutorials, we have seen how XML is similar to HTML. The difference between HTML and XML is:
- HTML was designed to display data and to focus on how data looks; whereas
- XML was designed to describe data and to focus on what data is.
HTML is a predefined markup language. A web browser knows how to display a HTML document because it knows about its tags and how to display them.
XML is not a predefined markup language. In XML you must define your own tags to hold the data you wish to represent, using a schema document as we saw in the previous tutorial. A web browser does not automatically know how to display the various tags of data, since they are not predefined. In the previous tutorial, you opened an XML file using a web browser and saw how the web browser was able to display the hierarchy of elements, allowing you to expand and close tags, but certainly the data in the document was not displayed in a fashion where someone could be handed the document and immediately understand what the data related to.
Something extra needs to be attached to the document giving instructions to the browser as to how the tags are to be displayed. That something extra is XSL.
XSL can transform an XML document into a HTML document or other ASCII format, it can filter, format and sort XML data, it can define parts of an XML document and output XML data to a variety of different devices.
Before you begin
This tutorial builds on the previous tutorial "LISCADXML - Structure and Syntax" and uses the same data set. If you have not familiarized yourself with the previous tutorial, it would be wise to do this before attempting this one, since knowledge of the concepts introduced there are assumed in this tutorial. If you have already completed this tutorial you can use the same data set. Otherwise if you wish to install the data set press the button to install the data file.
- Create a Basic HTML Point Report Using XML
Select File/Open... and open the data file called "LISCADXML Tutorial.see".
Select Tasks/Utilities, then Reports/XSL Introduction Tutorial.
If this option is not available in the Reports Menu, use the Reports / Add/Remove function to add it to the list.If the following message, or something similar, appears

then the MSXML 4.0 (or later) parser needs to be installed before this tutorial can be continued. To install the XML parser go to the Microsoft web site at www.microsoft.com and run a search on MSXML. You must download and install MSXML 4.0 (or later) before continuing.
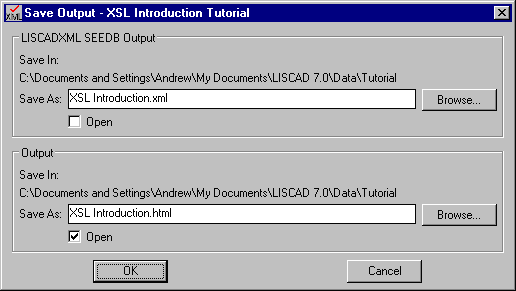
If the MSXML parser is installed correctly the following dialog box will appear.
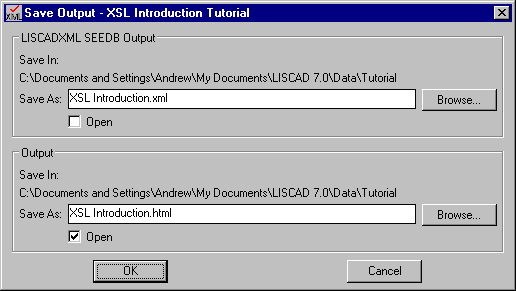
In the Save XML Output Save As field, type "XSL Introduction.xml".
In the Output File Save As field, type "XSL Introduction.html" and tick the Open box, if it is not already ticked.
Click OK.
A web browser should be automatically started and display the "XSL Introduction.html" document you have just created.
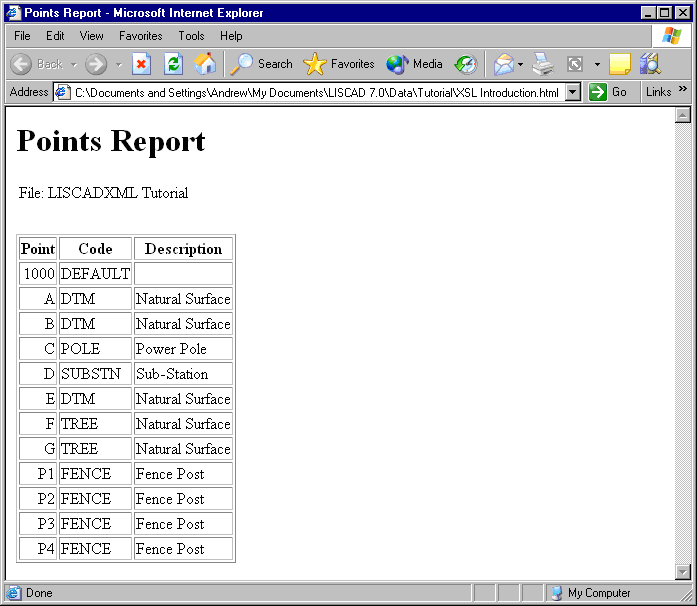
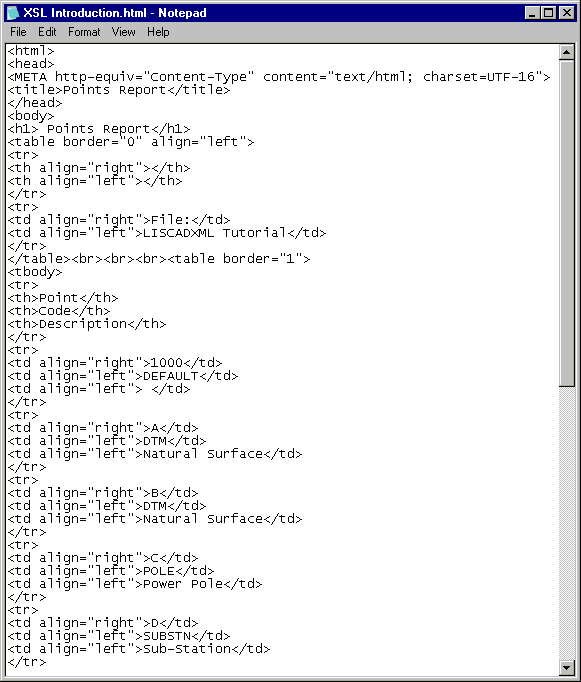
This is a HTML document which can be printed, e-mailed, published on the web, etc. at the user's discretion. The data shows the point identifiers, code and description for all points in the "LISCADXML Tutorial.see" file. All the data in this report is actually embedded in the HTML itself, so if you were to e-mail this to someone, you would have no need to e-mail the SEE file as well.
To see that the data is indeed embedded in the report, select View/Source from your web browser, or open the document using Notepad.
What happened to produce this HTML report?
When you clicked the OK button, the software extracted the XML data from the SEE file and used an XSL file to "transform" the XML data into a HTML document.
- Viewing and Editing XSL Style Sheets
To see what a style sheet is supposed to do select Utilities / Report / Add/Remove.
Locate XSL Introduction Tutorial in the Installed list and click on it. This should enable the Notes button.
Press the Notes button to bring up the notes explaining what this style sheet does.
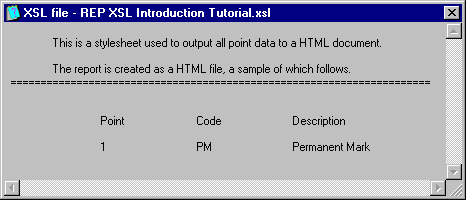
Close this window when you have finished examining this information box.
Let's have a look at the style sheet that produced the report. In the tutorial "LISCADXML - Understanding XML Files", the freeware application Cooktop was introduced as being a reasonable editor for XML files and style sheets. We will again use Cooktop to view and edit the style sheet in this tutorial.
The style sheet called "REP XSL Introduction Tutorial.xsl" will be found in your user folder. If you don't know how to find your user folder, then select Task/Utilities, then File/Close to close the job. Select Configure/Folders, and the dialog will display your User Folder location.
Open the "REP XSL Introduction Tutorial.xsl" file in your style sheet editor, in this case Cooktop.
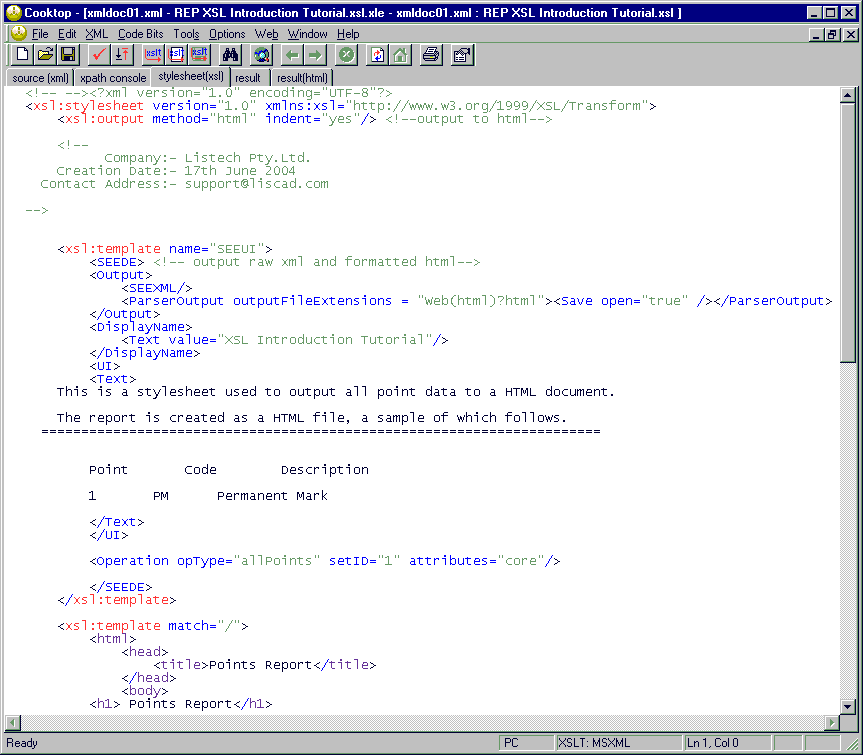
You are now viewing the style sheet that extracted the data from the LISCADXML file and transformed it into the HTML document just viewed.
You may immediately notice that there are similarities between this file and the XML file viewed in the previous tutorial. They both contain elements, attributes and values, although these names of these entities differ from what we saw previously. In fact, an XSL file can be classed as a type of XML file, in that it contains elements, attributes and entities.
Although the file does contain elements, attributes and values like an XML file, many of these elements are prefixed with "xsl:". All these types of elements belong to what is called the xsl namespace, which basically means that they belong to the xsl language and tell the parser to do something.
In reality, this file contains program code rather than data as in an XML file. This program will be transforming the XML data to some other output, defined in the style sheet.
Let's step through the file and find out what the parser is doing when it reads this "program". Note that this tutorial will make no real attempt to fully explain the entire xsl language and at any stage the user is encouraged to seek more detailed xsl references online such as at http://www.w3schools.com/xsl/default.asp
As in the previous tutorial, the very first line is a parser instruction, which can be ignored for our purposes.
- The Root Element
As far as we are concerned the style sheet file starts with the next statement
<xsl:stylesheet....This is the root element of all xsl style sheet files. If you now go to the end of the file you will see the statement
</xsl:stylesheet>
This denotes the end of the style sheet root element.
Everything that is defined in our style sheet file always lies between these opening and closing statements.
- Defining the Output File Type
The next statement <xsl:output method="html"......./> tells the parser that this style sheet will be outputting the results to a HTML file, which explains why we get a HTML file after the transformation is complete.
- The User Interface Template
The next statement <xsl:template name="SEEUI"> tells the parser that the next block of code up to the closing </xsl:template> tag, is defined as a template called "SEEUI". The name stands for SEE User Interface and this section is used to define what the user sees in LISCAD and what level of interaction the user has.
An XSL stylesheet consists of a set of rules called templates. Each template gets applied depending upon what data is being processed in the underlying XML data the style sheet is transforming. Often templates get matched to elements in the XML data. We will see an example of this later in this tutorial. This statement though is a little different in that this template is used by LISCAD to display the dialog we saw when we clicked the Export menu within LISCAD.
- The SEE Directive Element
The following statements, defined by the <SEEDE> element creates the dialog for us. (SEEDE stands for SEE Directive Element as it is the element in the style sheet that directs LISCAD as to what it should do to create the user interface.)
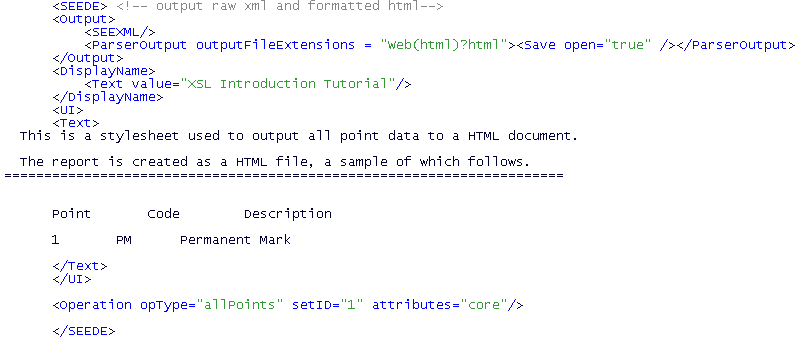
Note that the xsl: prefix is not present in these elements. That is because these elements don't actually belong to the xsl language, rather they belong to the SEE User Interface schema, defined by the LISCAD development team to allow the user to create their own User Interface (UI) for XML data reporting. This will be the subject of the next few tutorials. In the next tutorial "XSL Style Sheets - User Interface and Helper Files", we will edit this code and see how it affects the dialog screen.
You will notice that the text displayed by clicking the Notes button earlier is present here, encased in the <UI> and <Text> elements. These elements dictate what goes in the Notes screen. Any text placed between the <UI> and <Text> tags will be displayed in the Notes screen.
The <SEEDE> element heads a group of elements that allows us to tailor a dialog for the user to interact with, and also specify how we want the information output.
Underneath the <SEEDE> element, is an <Output> element, which heads a group of elements that allow us to specify the output files required. There are two elements here, the <SEEXML/> element and the <ParserOutput....> element. This means that the user will be required to supply an Output file name to save the HTML file to (from the <ParserOutput....> element) (which was "XSL Introduction.html") and a Raw XML file name (which was "XSL Introduction.xml") from the <SEEXML/> element.
Within the <ParserOutput....> element, there is an outputFileExtensions attribute, which means that the output file will have the extension default here of .html. Also within the <ParserOutput....> element, we have a <Save....> element, which means that we want to save the output file to disk. This element has the attribute open, which is set to "true", meaning that the Open checkbox in the dialog was selected by default.
The <Operation....> element tells us what data to get from the SEE database to be stored as XML data and transformed to HTML. The attribute opType is set as "allPoints" which means that all point data will be output. The attributes attribute is set to "core". In the previous tutorial, we talked about levels of attributes in relation to the LISCADXML-SEEDB-1.0 schema, and saw how attributes of LISCADXML-SEEDB-1.0 entities could be classed as either "core", "basic", "extended" or "all". Setting this attribute to "core" here means that for all Points in the SEE database, we want to get the attributes of the points which are marked as "core". This includes the point ID, Code and Description. We will look more closely at this attribute classification in later tutorials.
- Open the XML File that was Created
To get a better idea of what the <Operation....> element did, it is prudent to now examine the raw XML file we specified in the dialog, called "XSL Introduction.xml".
In Windows Explorer, navigate to the directory you saved this file to and you should find the file "XSL Introduction.xml". Open this file in your web browser.
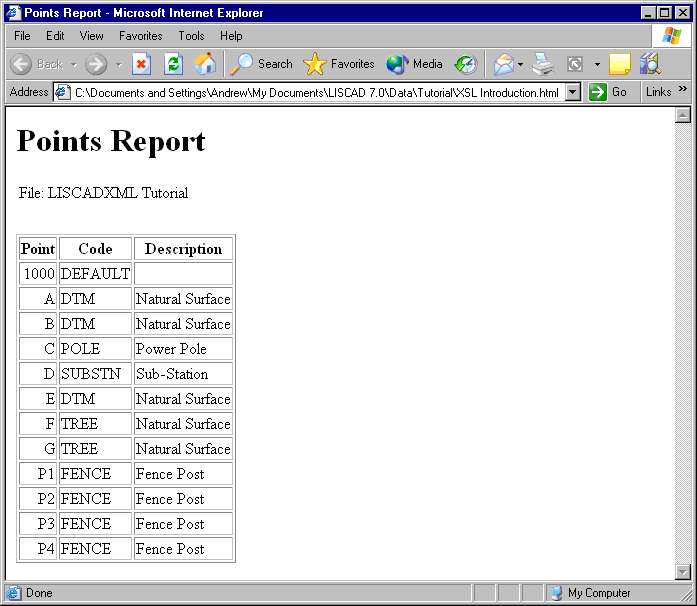
It may be a surprise to find that it appears the same as the HTML file viewed earlier. This is because by default when Internet Explorer opens an XML file, if the XML file has a reference to a style sheet, the style sheet is automatically applied and the result is the formatted output.
To view the source that generated this click View/Source within the Web browser.

The source shows us the XML data which underlies the report, with all the XML elements we have already seen in the previous tutorial. Why didn't the web browser display these tags as in the previous tutorial? Because the second line of the source
<?xml-stylesheet type="text/xsl" href="C:\Documents and Settings\All Users\Application Data\LISCAD\7.x\ REP XSL Introduction Tutorial.xsl"?>
tells the web browser that there is a xsl style sheet available at the specified location which is to be used by the web browser to format the XML data in such a way that it displays it like the HTML document.Comment out the second line, in other words add the "!--" and "--" text in the following way...
<!-- ?xml-stylesheet type="text/xsl" href="C:\Documents and Settings\
All Users\Application Data\LISCAD\7.x\ REP XSL Introduction Tutorial.xsl"? -->
Within Notepad, save and close the file.
Refresh the file in the Web browser.
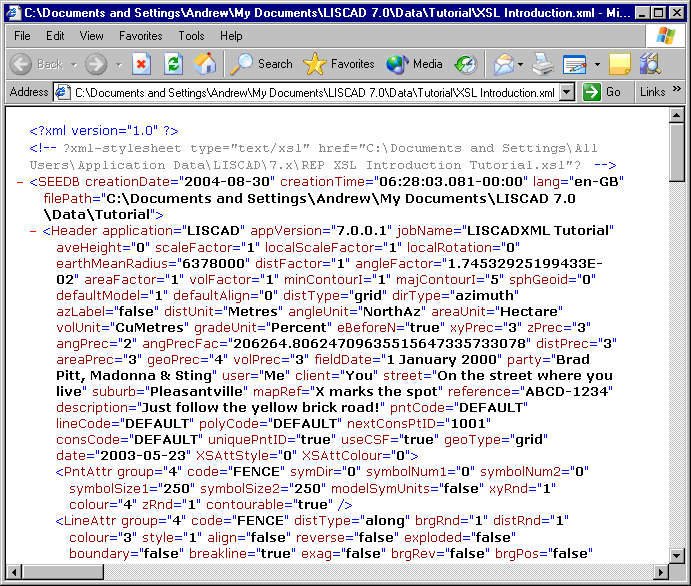
The Web browser displays the XML data as is did in the previous tutorial. This is because the reference to the style sheet has been commented out.
There is a difference between the XML data here and the XML data file from the previous tutorial, despite it originating from the same SEE database. This XML file does not contain any Line, Polygon or Model data, unlike the one from the previous tutorial. Also, the Point elements do not have all the attributes that were present in the previous tutorial's XML data. The Groups, Header, Symbols and Line styles elements are still there.
This is, of course, because the style sheet contained an <Operation....> element that selected all Points in the file and only the core attributes for those Points.
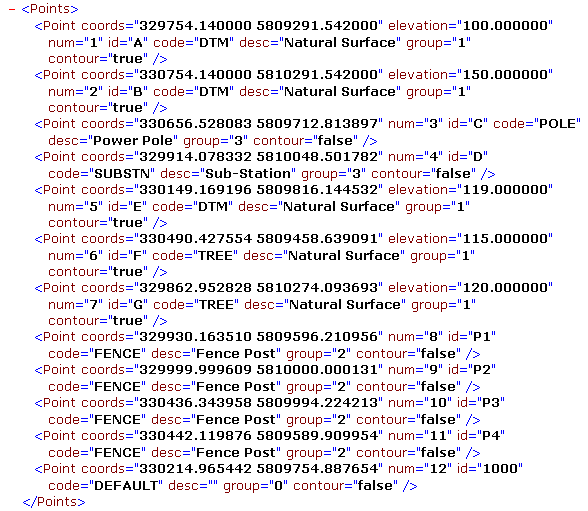
Attributes marked as "core" for Points are "num", "id","code","desc","group" and "contour", as documented in the LISCADXML-SEEDB-1.0 Schema documentation.
Varying the values for the attributes for the <Operation....> element would have produced different output in the LISCADXML file.
Return to the XSL file editor and we shall continue our analysis of the style sheet, but keep the Raw XML file open in the background.
- The Second Template Statement
The next statement <xsl:template match="/"> tells the parser that when transforming the raw XML file, when the root node of the XML file is found ("/" is the symbol for the root node, or the <SEEDB.... element in this case), which is, of course, at the start of the document, then do the operations in this template.
Because the parser will always find the root node first, this template will always be done first.
Note: To find out how to retrieve the attributes you require you need to have an understanding of XPath. XPath is a set of syntax rules for defining parts of an XML document. Documentation on XPath syntax can be found at http://www.w3schools.com/xpath/default.asp.
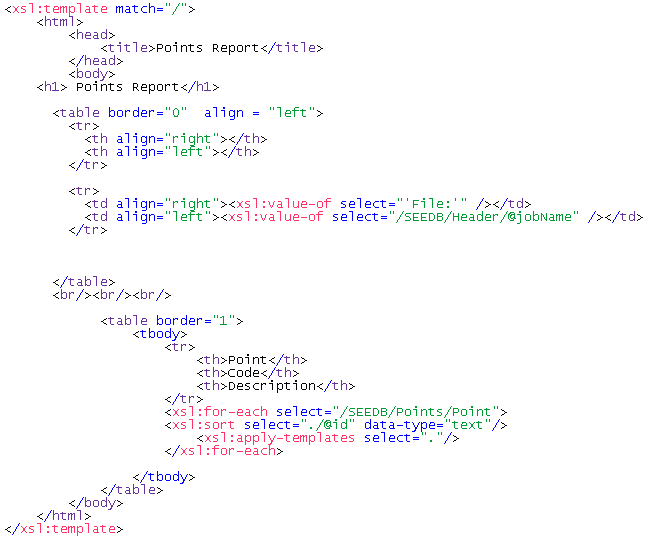
The next statements have purple elements, and anyone who is familiar with HTML will immediately recognize them as being standard HTML tags. What is happening here is that the parser is directly outputting these tags to the Output File, as you saw when you viewed the html file source earlier in this tutorial. This tutorial will not cover HTML tags in any depth, there are many places online and in text books where html tags can be referenced.
Briefly, the <title> tag is used to display a caption in the web browser window, in this case, the caption will be "Points Report".
The <h1> displays the bold heading Points Report, and the <table> starts a new HTML table.
The <tr> adds a new table row, <th> adds a table header, <td> adds data to the table.
In the first table element, note the <xsl:value-of..../> elements. These xsl elements will output the value of whatever is in the select attribute for these elements.
In the first example, the text " 'File:' " will be output to the HTML document. In the second one, the value of "/SEEDB/Header/@jobName" is output.
This needs a little more explanation.
This refers to the value of the attribute jobName, the @ symbol meaning an attribute is being referred to, for the element <Header..../> under the parent element <SEEDB..../>.
Looking at the <Header..../> element in the raw XML file

the attribute jobName has a value of "LISCADXML Tutorial". This explains where the File: LISCADXML Tutorial text in the HTML file comes from.
The second table element is the table that contains the table data in the HTML document. Note the table heading elements which output the text Point, Code and Description.
After the table headers have been output, we find some more xsl: elements.

The <xsl:for-each....> element is a way of looping through a section of code. The attribute select for this element has a value of "/SEEDB/Points/Point". This means that everywhere in the XML data where a <Point..../> element with a parent element <Points> and a grandparent element <SEEDB..../> occurs, apply the transformations enclosed in the for-each block. This means that the transformations apply to each <Point..../> element in the XML file in this case.
The <xsl:sort..../> element means to apply the transformations for the for-each block it is enclosed in, in the order its select attribute specifies. In this case, the value of the select attribute is @id. This means that the Point elements that will be transformed will be ordered by the value of their id attributes. The data-type attribute means that the ids are alpha-numeric values rather than pure numbers. This means that "10" would come before "9". Referring to the HTML output, you can see the effect of this in that the table is ordered by the Point column.
The <xsl:apply-templates..../> element is what the for-each loop is executing for each <Points> element. This element tells the parser to perform the transformations of the template which the attribute select points to. The value of the select attribute is ".". This means that it should apply the template which matches the element it is processing in the for-each loop - in this case the <Point..../> elements. So the parser will now look for a template which matches on Point, and execute the transformations stated in that template. This template can be found a little further down the style sheet.
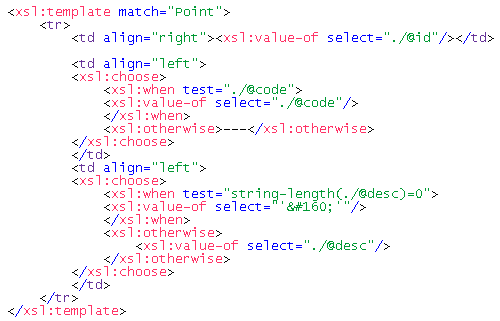
This template will output a table row each time it is performed (as many times as there are <Point..../> elements), as it is outputting a <tr> (table row) tag to the web browser. For each row, one column will contain the value which is output as a result of applying the <xsl:value-of select="./@id"/> element to the transformation, which means that the first column <td> (table data) will contain the value of the id attribute for the <Point..../> element being processed. This value will be right aligned.
The next column, left aligned, needs a little more explanation. There are some new xsl elements that need to be explained.
The <xsl:choose> element, combined with the <xsl:when....> and <xsl:otherwise> elements are a way to do some conditional testing in XSL language. The <xsl:when....> and <xsl:otherwise> element has a test attribute. If the value of this attribute evaluates to being true, then the transformation specified within the <xsl:when....> block is executed, else if it is false, the transformation specified with the <xsl:otherwise> block is executed.
In this case the test attribute has a value of "./@code". What this tells the parser to do is whenever a <Point..../> element has an attribute called code, which in this case is always true, output the value specified by the <xsl:value-of select="./@code"/> element, which means that the column will contain the value of the code attribute of the Point. If there was no code, hypothetically, then the text "---" would be output.
The next column, left aligned, works along the same principle as the previous column, in that a <xsl:choose> element, combined with the <xsl:when....> and <xsl:otherwise> elements are present. In this case, the test is on the string length of the desc attribute of the <Point..../> element being processed. If the string length is zero, i.e. there is no desc attribute, or the desc attribute is blank, then output the value of " ", which in HTML is actually a special character which a web browser interprets as white space. In other words the column is displayed, but it is blank. However, the <xsl:otherwise> block says that if there is a string for the desc attribute, then display that value instead. In other words this column will display the description of the point if it has one.
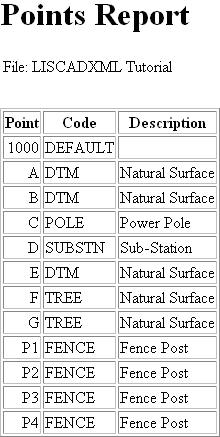
The first point does not have a description, therefore the description column shows just white space, according to the <xsl:choose> element just described.
This tutorial has provided an introduction to XSL Style sheets.
In the next tutorial "XSL Style Sheets - User Interface and Helper Files" we will continue to look at what style sheets are capable of, and edit the one we analyzed in this tutorial to get more information into a HTML report.
Conclusion
You have now completed the Tutorial on the XSL Style Sheets - An Introduction and should have a good understanding of the following:
- How to export SEE database data to XML data within LISCAD;
- How an XSL style sheet can be used to transform XML data into some other format, namely in this tutorial, a HTML document;
- How to view a XSL file;
- Some knowledge of the basic XSL elements.