To complete this tutorial you will require the Input / Output module.
Note: This tutorial cannot be completed using LISCAD Lite.
Aim
The aim of this tutorial is to explain the structure of LISCADXML and to explain some of the syntax used in XML files.
Before you begin
You are strongly advised to install a viewer that is specifically designed to work with XML files as described in the tutorial "LISCADXML - Understanding XML Files" before undertaking this tutorial. For demonstration purposes this tutorial will be using the Internet Explorer V6.0
This tutorial builds on the previous tutorial "LISCADXML - Understanding XML Files" and uses the same data set. If you have already completed this tutorial you can use the same data set. Otherwise if you wish to install the data set press the button to install the data file.
- Open the Example XML File
You can either use the "LISCADXML Tutorial.xml" file created in the previous tutorial, provided that you did not edit the file, otherwise perform steps 1 to 3 in the tutorial "LISCADXML - Understanding XML Files" to generate the required LISCADXML file.
Open the file in your chosen XML viewer and use the editor to present the XML file to you in the most readable fashion.
- Parser Instructions
The first line of an XML file is always of the following form: <?xml version="1.0"?>
This statement tells the parser (the application that will interpret the XML file), that this is an XML file and that it is based upon Version 1.0 of the XML standard.
Any statement in an XML file starting with a <? and ending with ?> is a parser statement and does not relate to the actual body of the XML file that we are interested in and so can be ignored for our purposes.
- The Root Element
As far as we are concerned the LISCADXML file starts with the following statement:
<SEEDB.... This is called the root element of the XML file.
If you now go to the end of the file you will see the statement:
</ SEEDB> This denotes the end of the XML root element.
Everything that is defined in our LISCADXML file always lies between these opening and closing statements.
- Elements, Attributes and Values
An element identifies an object in an XML file. An element always starts with an opening < before the element name. The element name will then be followed by the element's attributes which are equated (=) to an attribute value contained within double quotes. The element names, attributes and their values are separated by spaces. The number of spaces is irrelevant. An element can be terminated by />, or with a matching end tag e.g. </ SEEDB>
The following are both valid representations of the same element:
<Group displayed=" true" name="ELECTRICITY" num="3" />
<Group
displayed="true"
name="ELECTRICITY"
num="3"/>The content of the element is very easy to read. This is a Group element with 3 attributes displayed, name and num. The attributes are assigned the values true, ELECTRICITY and 3 respectively.
The colours have no meaning other than they assist the reader to quickly identify element names, attributes and values. Different viewers will use different colours and some viewers will allow you to set your own colours to suit your preferences.
- Nested Elements
To assist readability and to keep elements in logical categories, elements can be nested. For instance every <Group.../> sub-element is contained within the <Groups> element making it a nested element.
A nested element starts with the name contained within opening and closing angle brackets.
<Groups>
The nested element is terminated with the element name preceded by a / contained within opening and closing angle brackets.
</Groups>
The <SEEDB....> root element is the ultimate nested element which contains all the SEEDB elements, attributes and their values and is terminated by a </SEEDB> statement.
Nested elements can also have attributes and values in their own right. These attributes and values immediately follow the nested element name and are terminated with the closing >
The <SEEDB.... root element has attributes and values that relate to the entire LISCADXML file which identify the date and time (GMT) when the LISCADXML file was created.
<SEEDB creationDate="2003-06-27" creationTime="05:36:11.443-00:00"> - Comments
XML files can contain comments throughout the file. Anything lying within the opening <!-- and the closing --> angle brackets are interpreted as comments.
<Groups>
<!-- These are all the Groups associated with this file -->
<Group displayed =" false" name=" DEFAULT" num="0" />
<!-- Group numbering always starts at 0 -->
<Group displayed =" true" name=" DTM" num="1" />
<Group displayed =" true" name=" PLAN" num="2" />
<Group displayed =" true" name=" ELECTRICITY" num="3" />
<!-- There are 4 groups in this file -->
</Groups>Note: Typically a LISCADXML file created by LISCAD will not contain comments. This is because XML files are for data definition, they should be relatively readable and it is not usually necessary for them to be read by users.
- How to Read the "LISCADXML Tutorial.xml" File
We will now have a closer look at a LISCADXML file. The file "LISCADXML Tutorial.xml" is a typical LISCADXML file but it does not contain all the elements supported by LISCADXML. As we only want to view the file, open it in your web browser. If you are using Internet Explorer V6.0 to view the file you can contract the file by clicking on the minus signs next to the elements that are immediately under the SEEDB root element.
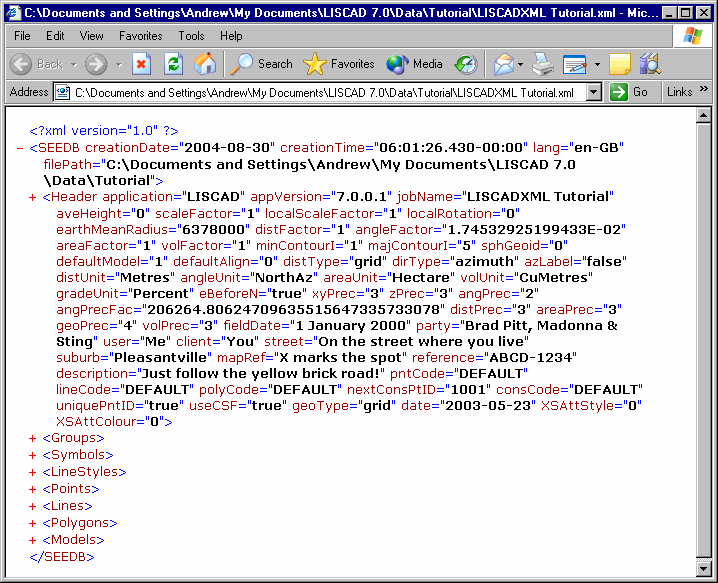
From the above diagram you can see that the <SEEDB... root element contains the following sub-elements:
<Header>
<Groups>
<Symbols>
<LineStyles>
<Points>
<Lines>
<Polygons>
<Models>
It can also be seen that the <SEEDB... root element has its own attributes, which define the date and time the file was created. The <Header> element also has attributes of its own which define the application that the LISCADXML file was generated from as well as other header information that relates to the file as a whole. The fact that each of these elements has a + sign next to it indicates that the element is a nested element containing other sub-elements.
Now expand the <Groups> element.

This tells us that there are 6 groups numbered 0 to 5 and at the time the LISCADXML file was created the DEFAULT Group was turned off and all other groups were displayed. There should only be 1 <Groups> element in an LISCADXML file.
If you wish to expand the <Header... element you can see that it contains other elements relating to object attributes, display settings, rounding settings and design parameters. These hold the settings that were active within the LISCAD data set at the time the LISCADXML file was created. There should only be 1 <Header.... element in an LISCADXML file.
Next expand the <LineStyles> element.

This contains two <LineStyle... elements representing the line styles "A Continuous Line" and "Fence". There is also a definition attribute which consists of a string of numbers. These numbers are not intended to be "readable" but represent the binary definition of the line style.
If you expand the <Symbols> element you will see that this is very similar to the <LineStyles> element.
Now we will start by looking at the objects that make up the LISCAD data file. Expand the <Points> element.
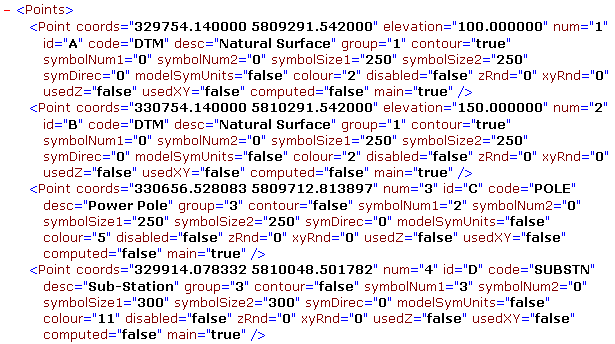
This is a nested element containing 12 <Point..../> elements which represent all the points in the LISCAD data file. <Point..../> has a coords attribute, which is equal to 2 values. The first number is the Easting and the second the Northing. Each <Point..../> also has a unique number attribute, which in this case are numbered from 1 to 12. Each <Point..../> also has an identifier. These 3 attributes are the only required attributes for a <Point..../>. All other attributes are optional.
Some of the optional attributes have values that relate directly to the point. E.g. desc="Natural Surface" tells us what the description of the point is. Other attributes are references to other elements in the SEEXML file. E.g. group=" 1" is a reference <Group..../> element number 1 is nested inside the <Groups> element, which means that this point is on the DTM group. Likewise symbolNum1="0" is a reference to the <Symbol.... element num="0" is nested inside the <Symbols> element meaning this point has the "Null Symbol" assigned to it.
The reason for using references means that repetition in the file is minimised. If many elements all use the same complex attribute, then that attribute only has to be defined once and all elements that have the same attribute can reference it without having to redefine it each time.
Now expand the lines element.
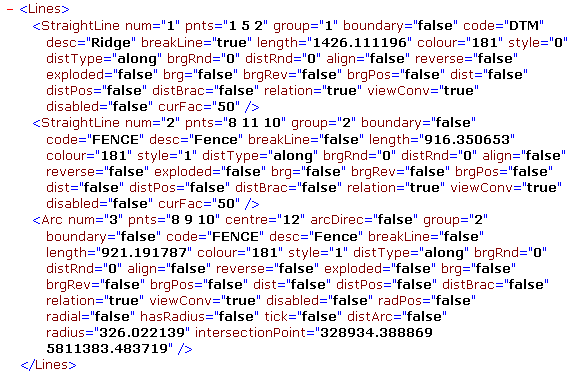
This is very similar to the Points element. Each "Line" is contained within the Lines nested element. Within the Lines there are elements that define what type of line it is. In this file the line elements are <StraightLine..../> and <Arc..../> lines. However SEEXML caters for all line types supported by LISCAD, e.g. Circles, Splines, Offsets etc.
In the same way that Points reference the Group etc., so do the Line elements. The Lines though do not contain any information about their geometry. This is determined by reference to the Points that make up the Line. This can be seen by looking at the pnts attribute. For instance the StraightLine num="1" is made up of 3 points 1, 5 and 2 in that order. Note that 1, 5 and 2 are the Point num values, not the id values.
- The LISCADXML Schema
The XML schema is the document that defines all the elements and their associated attributes and value types. Wherever possible meaningful names are assigned to elements and attributes to make the XML file as readable as possible. In some circumstances abbreviations are used to keep the file size to a minimum.
Because an element or attribute has been defined in the schema it does not necessarily follow that it has to appear in the XML file. However some are required whereas most are optional.
The structure of the LISCADXML file is defined in the XML Schema Document "LISCADXML-SEEDB-1.0.XSD". This file is very similar to an XML file but rather than contain data it contains the definition of the data. The "LISCADXML-SEEDB-1.0.XSD" file should be able to be opened with most XML editors. You can find this file on the LISCAD installation CD in the "XML Documentation" folder, or it can be downloaded from the LISCAD web site at http://www.listech.com/liscad/library.aspx?library=miscellaneous. If you open this file you will find that it defines the elements, what attributes an element has and the type definition of the attribute. This file should not be edited and should only be used for reference to help understand LISCADXML files.
- LISCADXML Schema Documentation
The XSD file can be difficult to follow or locate the element or attribute you are interested in. To make the file easier to read and follow it is better to use the documentation file that has been generated from the XSD file. This file is a HTML document called LISCADXML-SEEDB-1.0.HTML.
You can find the LISCADXML-SEEDB-1.0.html file on the LISCAD installation CD in the "XML Documentation" folder, or it can be downloaded from the LISCAD web site at http://www.listech.com/liscad/library.aspx?library=miscellaneous. Open the LISCADXML.html file by double clicking on it. It should open automatically in your default web browser. This file contains links between the elements in the LISCADXML file making it quicker and easier to locate the information.
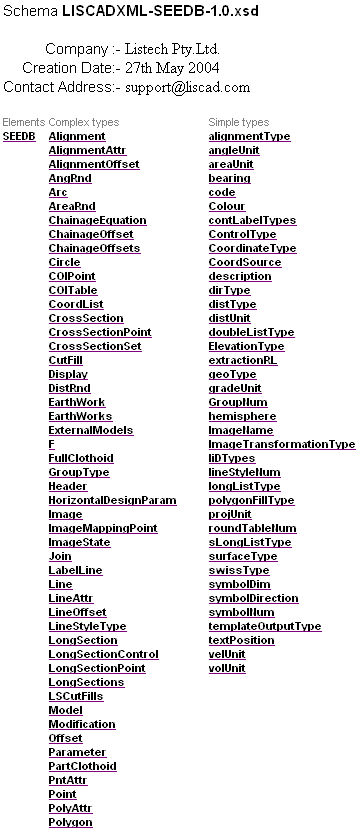
As an example of how to use this document to locate information, we shall locate the information concerning the Model element in the "LISCADXML Tutorial.xml" file.
The Models Element
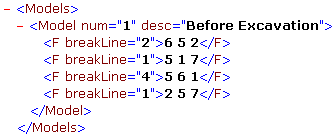
We shall use the documentation to find out what these elements relate to.
Hover the mouse over the SEEDB link in the html file. The cursor will change to depict a pointing right hand, indicating that clicking at that point will direct the user to another place in the document. Clicking over the SEEDB link takes us to the information about the element SEEDB, which is the root element for the SEE database.
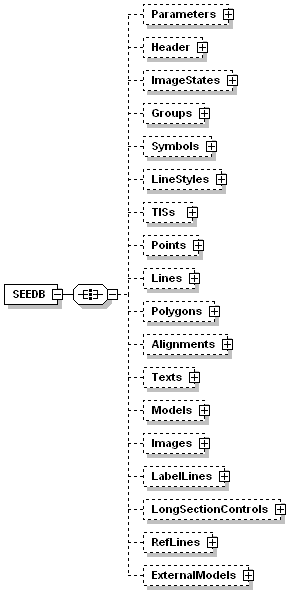
This shows the information about the SEEDB root element, more specifically, what types of elements are available under this element. Elements which have a dotted line around them indicate that they are optional, if they have a solid line around them, it indicates that they are a required element. The SEEDB element is the only required element in a LISCADXML file. The "LISCADXML Tutorial.xml" file contains the Header, Groups, Symbols, LineStyles, Points, Lines, Polygons and Models elements. The plus sign in an element indicates that it can be expanded to show further information.
Click over the Models element link.
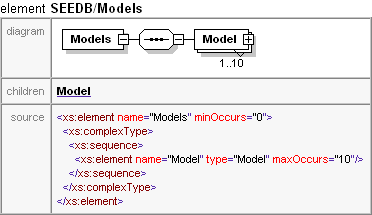
This information shows that the Models element has child elements called Model.
The notation under the Model element, "1..10", means that up to 10 models are allowed in a SEE database file.
Click over the Model element link.
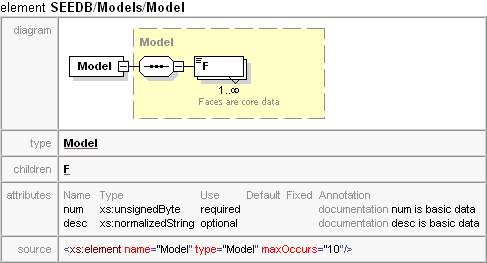
This shows that the Model element has an unlimited number of child elements called F. F stands for Faces.
The Model element has a type called Model. This introduces an important concept. Some elements in the SEEDB schema are very similar in what they represent, and can be classed together. For example, the schema shows us that there are elements for straight lines, arcs and splines, yet as the user may already know, these are just types of Lines. To document this fact, these elements have a type of Line. Line is called a Complex Type. The schema documentation lists all the Complex Types which elements may belong to. The yellow rectangle indicates that the Model element is of complex type Model.
The Model element has two attributes. The "num" attribute, which is a required attribute, and the "desc" attribute, which is optional. Attributes can be classified in their relationship to the element. This classification becomes important in more advanced tutorials, but briefly, there are four levels of attributes in an element, called core, basic, extended, all. Both "num" and "desc" are classified as basic for the Model element.
Click over the F element link.
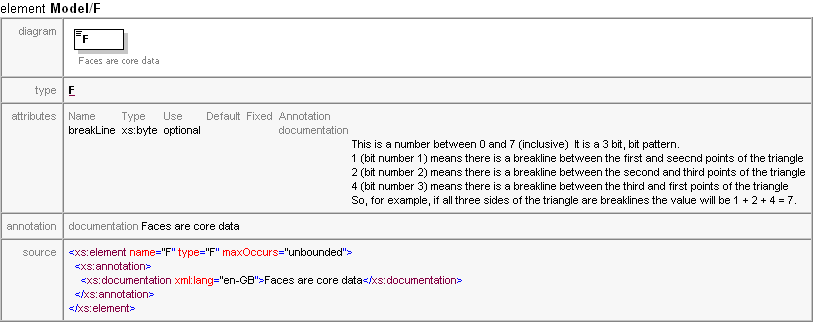
This shows that the F, or faces, element is a core element and that it has no child elements. It is of type F. It has one optional attribute called "breakline". The annotation for a breakline describes what the values for a breakline attribute mean.
Click over the F type link.
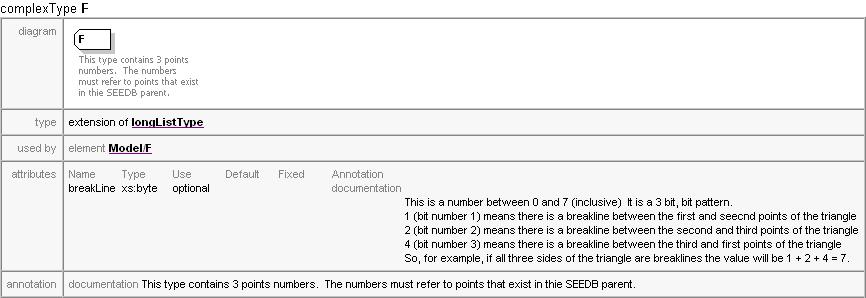
This shows the elements of type F contain three point numbers, the numbers refer to points that exist in the SEEDB parent.
Relating all this acquired information back to the "LISCADXML Tutorial.xml" file, we can see that the model in this file has a "num" attribute of 1, and a "desc" attribute of "Before Excavation". It has four faces. The first face is defined by points 6,5,2 and side 2 is a breakline; the second by points 5,1,7 and side 1 is a breakline; the third by points 5,6,1 and side 3 is a breakline; and the fourth by points 2,5,7 and side 1 is a breakline.
This tutorial has described the structure and syntax of LISCADXML files, viewed with a Web browser.
In the next tutorial "XSL Style Sheets - An Introduction" we will look at how to display the contents of a LISCADXML file in a more user friendly way, introducing the concept of Style Sheets.
Conclusion
You have now completed the Tutorial on the Structure and Syntax of LISCADXML files and should have a good understanding of the following:
- The difference between element, attributes and values in XML;
- How to expand and close elements in an XML file;
- What an XML schema document is;
- How to use the schema to find information about elements.