To complete this tutorial you will require the Input
/ Output module.
Note: This tutorial cannot be completed using LISCAD Lite.
Aim
The aim of this tutorial is to explain the basics of what XML is and to demonstrate how to create a LISCADXML file and the tools required to view and edit XML files.
XML is an acronym for EXtensible Markup Language. It is similar to HTML (Hyper Text Markup Language) which is used to design web pages for the worldwide web (www). The difference between HTML and XML is:
- HTML was designed to display data and to focus on how data looks; whereas
- XML was designed to describe data and to focus on what data is.
XML is not a replacement for HTML.
XML does not actually do anything. XML is created to structure, store and send information. Unlike HTML where the tags are predefined and represent specific format instructions, in XML you must define your own tags to hold the data you want it to represent.
Bearing this in mind the developers of LISCAD have devised an XML structure to hold every object of a SEE file. This specific implementation of XML to describe a SEE file has been called LISCADXML-SEEDB-1.0.
The advantages of having a LISCADXML file are:
- It is possible to create an ASCII representation of the entire SEE data base. This will provide future portability between different versions of the LISCAD data base as a later version of LISCAD will be able to create a LISCADXML file and an earlier version of LISCAD will still be able to read it (provided that version of LISCAD supports LISCADXML).;
- It exposes the LISCAD data base to developers of other systems that wish to read LISCAD data files into their systems, or create files that can be read into LISCAD:
- But most importantly, it gives the LISCAD user the ability to control the output from LISCAD. This is done through an XML Style Sheet which the user can write to create files in a format specific for input into another application, or for uploading into a specific total station, or for creating reports that are specific to the users organization and work requirements or for whatever reason you can think of.
This tutorial focuses on understanding the structure of the LISCADXML. Style Sheets will be discussed in future tutorials.
Before you begin
Select this button to install the required data files.
- Create a LISCADXML File
Select File/Open and open the data file "LISCADXML Tutorial.see". This is a very simple file containing 12 points, 2 straight lines, 1 arc, 1 polygon and 1 digital terrain model.
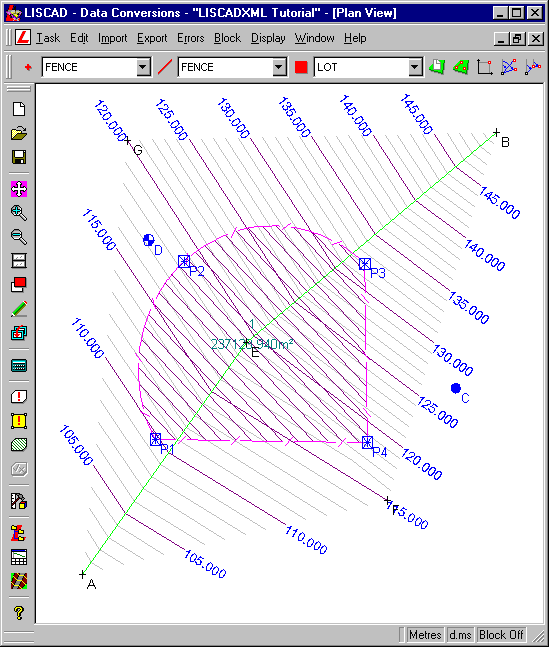
We will now create a LISCADXML file of this data set.
Select Task/Data Conversions and then Export/LISCADXML-SEE Database from the main menu. (If this option is not available in the Export Menu, use the Add/Remove function to add it to the list.)
This will open the LISCADXML SEE Database dialog.
In the Save As field enter "LISCADXML Tutorial". If necessary use the Browse button to select the folder that you wish to write the XML file to.
Do not check the Open checkbox.
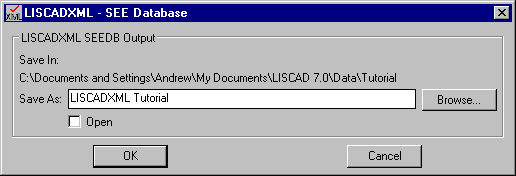
Press OK. This will create a file called "LISCADXML Tutorial.xml" in your selected folder.
- View the LISCADXML File Using Notepad
The "LISCADXML Tutorial.xml" file is a straight XML file that has been defined using the LISCADXML schema. Which means it contains the definitions of all the objects that make up this particular LISCAD SEE data file.
From this point in the tutorial we no longer need the LISCAD SEE application so it can be minimized. (Under normal circumstances you would close LISCAD however closing LISCAD will also close the tutorial.)
An XML file is a straight ASCII file that can be read or edited using any simple text editor. However there are advantages in using a viewer or editor that is particularly designed for the task of working with XML files.
We will demonstrate this by opening the XML file in different applications.
As most Windows users have Notepad.exe installed on their computer we will begin by opening the XML file in this application.
Run Notepad, select File/Open and in the Open dialog box type *.xml in the File name field. Now navigate to the folder where you saved the "LISCADXML Tutorial.xml" file, click on it and press Open. If the file is displayed wider than the Notepad Window select Format/Word Wrap to wrap the text to the width of the window.
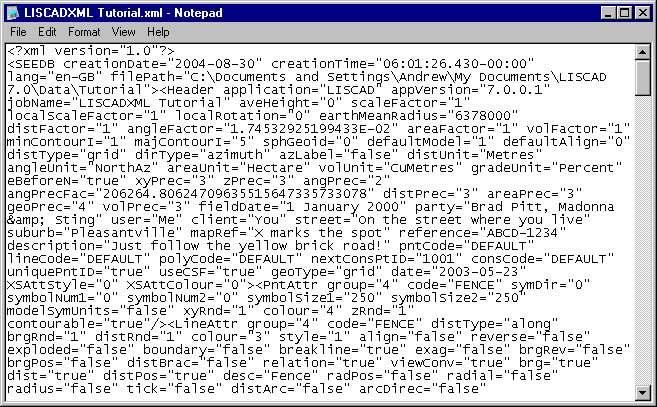
As you can see the file appears as a compressed mass of information. This is because an XML file is basically a "data stream" of information. It is not formatted in any way, pieces of information are just written out one after the other in a continuous stream.
This confirms one of our original definitions about XML which stated that "XML was designed to describe data and to focus on what data is."
Notepad can certainly be used to view, edit and create an XML file should you wish. But it is not the ideal environment for working with XML unless you like using the Find command to locate Tags and Attributes in the file. However if you don't have access to any other more suitable application, it can be used.
Generally speaking you should never really have a need to edit a LISCADXML file generated from LISCAD, but you will need to be able to read a LISCADXML file if you intended to create your own Style Sheets to format the data into a form you require.
Close down Notepad.
- View the LISCADXML File Using Internet Explorer
As most Windows installations have Internet Explorer installed this application can be used to view XML files. Although Internet Explorer cannot be used for editing it will do a much better job of formatting the file so that it can be read more easily than in Notepad.
Note: Netscape or any other Web Browser application should also be able to be used in place of Internet Explorer.
The easiest way of opening an XML file in Internet Explorer is to open Windows Explorer, navigate to the folder containing the XML file and clicking with the right mouse button. From the popup menu select Open With and then choose your Web Browser from the list.
Alternatively it may be possible to double click directly on the file. If the XML file extension is associated with your Internet Browser it should open it up in that application.
Another way of opening the file in your Web Browser is to open the Web Browser first then select File/Open and navigate to the XML file on your disk.
When opened in Internet Explorer 6.0 the LISCADXML file should look like this:
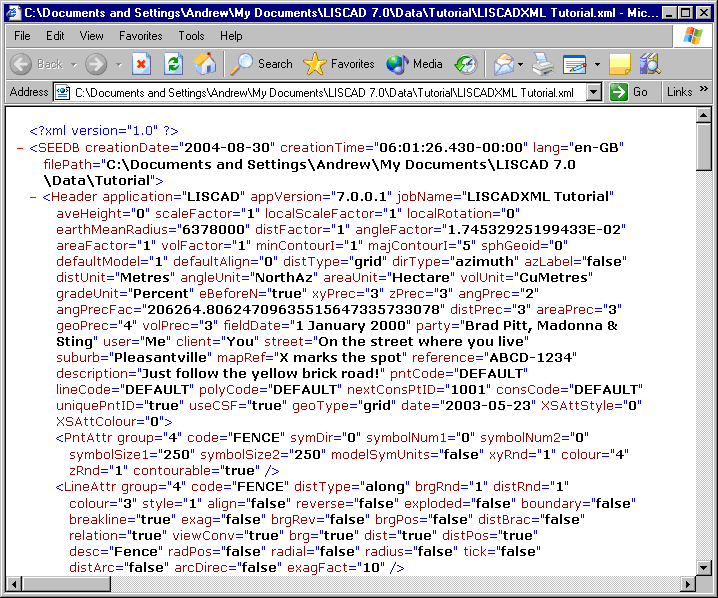
Now the file is clearer to read as it has been formatted so that each new object starts on a new line. It is also colour coded making it easier to read tags, attributes, values and any other object types in the file.
Another useful feature that is apparent in Internet Explorer is the fact that it is displayed in a tree structure. This can be seen by the fact that objects inside other objects are indented and the parent object has a minus sign next to it.
Click on the minus sign next to the - <Header.... statement. The minus sign will change to a plus sign and the <Header... section will collapse.

This feature can be used to hide sections of the XML file allowing you to concentrate on what you are interested in. It also gives you a better indication of what objects are at the same level as each other as well as showing you what objects are contained within other objects.
Internet Explorer is a good application for viewing the files but ultimately if you are going to be creating Style Sheets you will need an application that has similar display capabilities but also allows you to create, edit and validate files as well.
- View the LISCADXML File Using Cooktop
Although you can purchase applications for this task there are also several very good packages that are freeware that can be downloaded from the World Wide Web. A search on the Internet using the keywords "XML Editor Freeware" (do not include the quotes) will find plenty of applications to choose from.
For this next step of the Tutorial the freeware application Cooktop is being used which has reasonably broad functionality.
Note: LISTECH Pty Ltd does not endorse Cooktop as its preferred application for editing XML files and Style Sheets. It is strongly recommended that you evaluate other similar applications to find one that suits your requirements.
When the XML file is opened in the Cooktop XML Editor it looks the same as the format in Notepad, but it is a bit easier to read as it is colour coded.
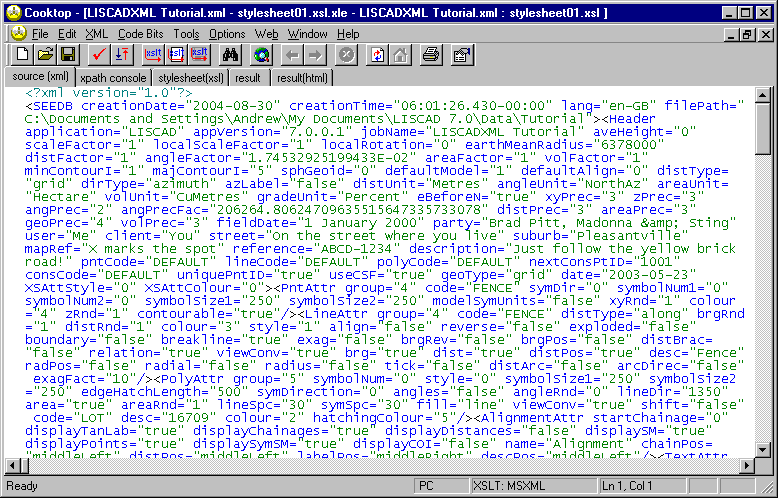
However Cooktop has tools that allow you to reformat the file which, as you can see, makes the file much easier to follow.
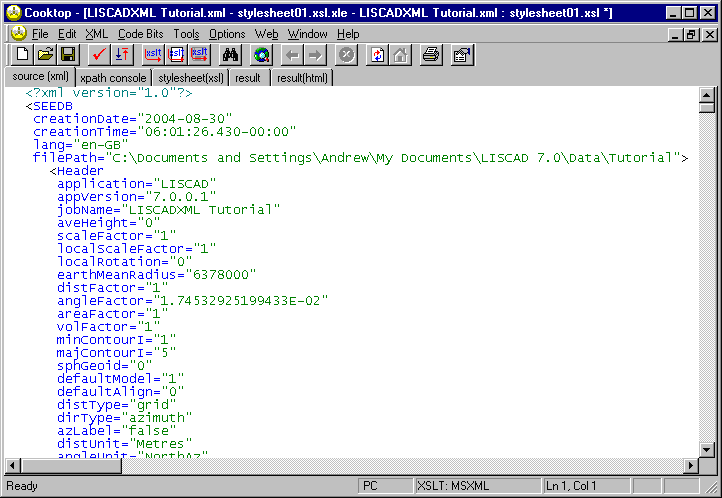
Note that in all these different representations the file has not changed at all. In the display above the only difference is that white space has been inserted and each item has been placed on a new line to make it more readable.
Although there is no necessity to edit this file you will find that it can be edited similarly to using any other text editor. Experiment with your particular application to get a feel for its capabilities but do not save any changes to the file.
In the next tutorial "LISCADXML - Structure and Syntax" we will look at the contents of the LISCADXML file.
Conclusion
You have now completed the Tutorial on Understanding XML and should have a good understanding of the following:
- That XML is designed for data whereas HTML is designed for presentation;
- XML is an ASCII text file that can be opened in any basic text editor;
- That different applications will present the XML file to you in different ways;
- That it is best to have an editor that is specifically designed for viewing and editing XML files.