To complete this tutorial you will require the Input / Output module.
Note: This tutorial cannot be completed using LISCAD Lite.
Aim
The aim of this tutorial is to continue the examination of XSL Style Sheets, extending the concept of the LISCAD XML User Interface, by introducing parameter controls to the Interface.
In this tutorial, we will create a style sheet that will select all Lines in a SEE database that belong to a certain Group and have a certain maximum length. We will output these Lines to a HTML document, displaying the points that the Line joins, the type of Line, the length of the Line and the Azimuth.
In the previous tutorial "XSL Style Sheets - Interface Filter Controls", we saw how the report "XSL Filter Controls Tutorial" style sheet was edited to produce a HTML document that output Line data selected via using the Line Filter control. We saw how we could filter out data within code too, using the <xsl:if....> element, filtering out Lines less than 1 metre in length. In this tutorial we will edit the Style Sheet to allow the user to interactively set the minimum length to any value desired.
Firstly, we will introduce a control that allows the user to enter some value. The XSL style sheet could then request this value and use it for some purpose within the Style Sheet. In this example, the style sheet will read in a tolerance from the user and output all line segments of a length less than the value entered. This control is called a Parameter control.
We need to be able to display within LISCAD some sort of dialog box with OK and Cancel buttons and some control which will allow the user to enter data. We saw in the previous tutorial that the <Dialog....> element was to be used for this purpose. To find out about parameter controls, we will refer to the LISCADXML-SEEDE-1.0 Schema document. You can find the "LISCADXML-SEEDE-1.0.html" file on the LISCAD installation CD in the "XML Documentation" folder, or it can be downloaded from the LISCAD web site at http://www.listech.com/liscad/library.aspx?library=miscellaneous.
Before you begin
This tutorial builds on the previous tutorial "XSL Style Sheets - Interface Filter Controls". If you have not familiarized yourself with the previous tutorial, it would be wise to do this before attempting this one, since knowledge of the concepts introduced there are assumed in this tutorial.
Select this button to install the required data files.
- Understanding Parameter Controls
Open the "LISCADXML-SEEDE-1.0.html" file by double clicking on it. It should open automatically in your default web browser.
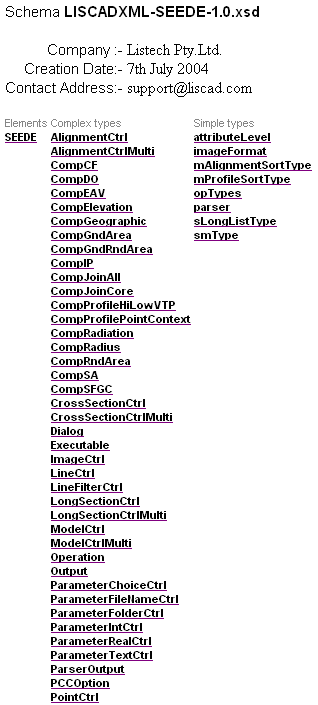
Click on the SEEDE element link.
Click on the Dialog element link.
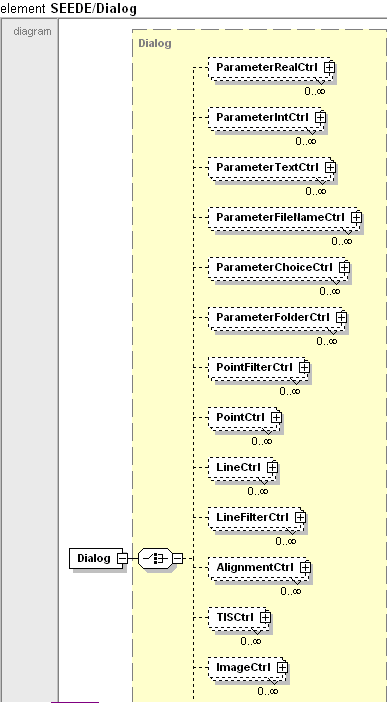
We can see that there are some controls that start with the "Parameter" prefix. These are all types of Parameter controls and differ by the type of value that they request from the user. For instance, ParameterRealCtrl can request real numbers, 1.23, -9.89, etc, ParameterIntCtrl can request integers, 1,2,3, etc.. ParameterTextCtrl can request text. The ParameterChoiceCtrl can be used to display a drop down list. It has child elements called <Option....> which can hold the choices that will fill that drop down list.
In this tutorial, we will be using the ParameterRealCtrl control.
Click on the ParameterRealCtrl link.
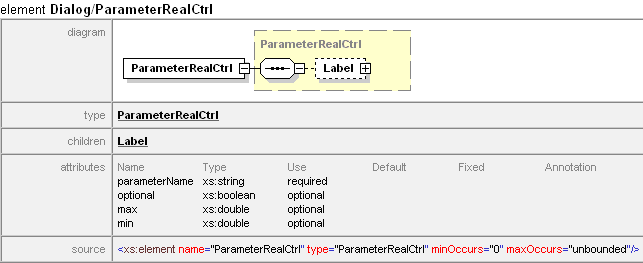
This is the interface control we will use to request the value which we will use as a maximum length for the lines we want. The <Label> child element will hold the prompt, so we will enter something appropriate e.g. "Maximum Length:". The parametername attribute is used to name the variable that the value will be saved into. The optional attribute is used to set whether a value must be input into this control or not. If optional is false, a value must be input, else the user cannot continue until a value is entered.
- Add a Parameter Control to the User Interface Dialog Box
Open the "REP XSL Parameter Controls Tutorial.xsl" file in your style sheet editor, in this case Cooktop. This is the style sheet we had at the end of "XSL Style Sheets - Interface Filter Controls" tutorial.
Now, let's edit the style sheet to incorporate a parameter control.
Add the ParameterRealCtrl to the <Dialog....> element, just after the </LineFilterCtrl> element
    </LineFilterCtrl>

    <ParameterRealCtrl parametername="maxvalue" optional="false">
        <Label>
            <Text value="Maximum Length:" />
        </Label>
    </ParameterRealCtrl>
We have given the control the name of "maxvalue". Note this, since shortly we will use this name in the code block we need to add to use the value entered into the control. We are also making sure that some value must be entered into the control, by setting the optional attribute to "false". Save the style sheet.
In LISCAD, Select File/Open and open the "XSL Interface Controls.see" file.
Select Tasks/Utilities, then Reports/XSL Parameter Controls Tutorial. If this option is not available in the Reports Menu, use the Add/Remove function to add it to the list.

This is the Parameter Control in operation with the Line Filter Control.
- Test How the Parameter Control Works
To see what validation the control does, enter some text into the control and click OK.

Note that nothing happens except that the focus returns to the control, awaiting valid input, which of course is a numerical value.
Try entering nothing and see how the control handles that. Then enter a valid number, say 1.23
Enter the following into the edit fields.
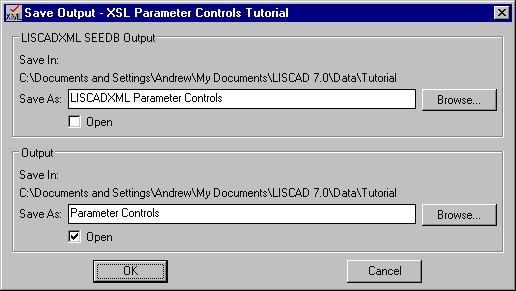
We are mainly interested here in specifying the name of the LISCADXML File. This is because there is something new in the LISCADXML file caused by the introduction of the Parameter control.
Click OK.
Open up the LISCADXML file in your web browser. It will look the same as the Output HTML initially. In your browser select View/Source, to open the Source up in Notepad. Within the Notepad file, comment out the second line of the XML, which refers to the style sheet we are editing. If you are unfamiliar with this procedure, review the previous couple of tutorials in which this method has been documented.
Save the Source, and refresh your web browser Window. The XML elements should now be displayed.
At the top of the file, after, the <SEEDB....> element, you will find a new element. The <Parameters> element.

We can see that we now have a <Parameter..../> element which has a name attribute of "maxvalue" and a value attribute of "1.23". So, by introducing a <ParameterRealCtrl....> element, to the style sheet, LISCAD has output a <Parameter..../> element in the raw XML file for us to access. It is in this way that we can access the value of the <Parameter..../> element within the style sheet.
- Accessing the Parameter Value Entered Via the Style sheet
We shall now edit the code in the Style Sheet to access this element.
Add the following code line to the Style Sheet in the XSL editor in the template matching on "StraightLine".
<xsl:variable name="max" select="/SEEDB/Parameters/Parameter[@name='maxvalue']/@value"/>
Also modify the code in the <xsl:if....> element, such that instead of the test looking for plane distances less than 1.00, it is less than $max.
Thus...

What does all this mean?
The <xsl:variable..../> element is a way within XSL of setting up variables and assigning data to them. In this example, we are setting up a variable called "max", as given by the name attribute. The value returned by the select attribute is the value that will be stored in "max". Referring to the LISCADXML data, the value of /SEEDB/Parameters/Parameter[@name='maxvalue']/@value is 1.23, being the value of the value attribute for the <Parameter> element whose name attribute is 'maxvalue'.
So we have a variable called "max". In the <xsl:if....> code, we refer to this variable. When you refer to variables in XSL, always precede the name of the variable with the "$" sign. Hence the $max syntax.
Save the style sheet and go back to LISCAD.
- Testing the Parameter Control
In LISCAD, Select File/Open and open the "XSL Interface Controls.see" file.
Select Tasks/Utilities, then Reports/XSL Parameter Controls Tutorial. If this option is not available in the Reports Menu, use the Add/Remove function to add it to the list.
Enter the following into the edit fields.

Click OK.
Enter the following into the edit fields.
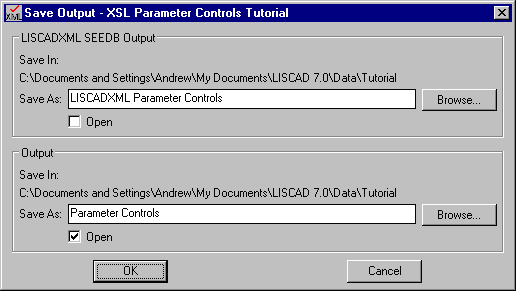
Click OK.
We have a report which is the same as the original one, where we only get Lines less than 1 metre.
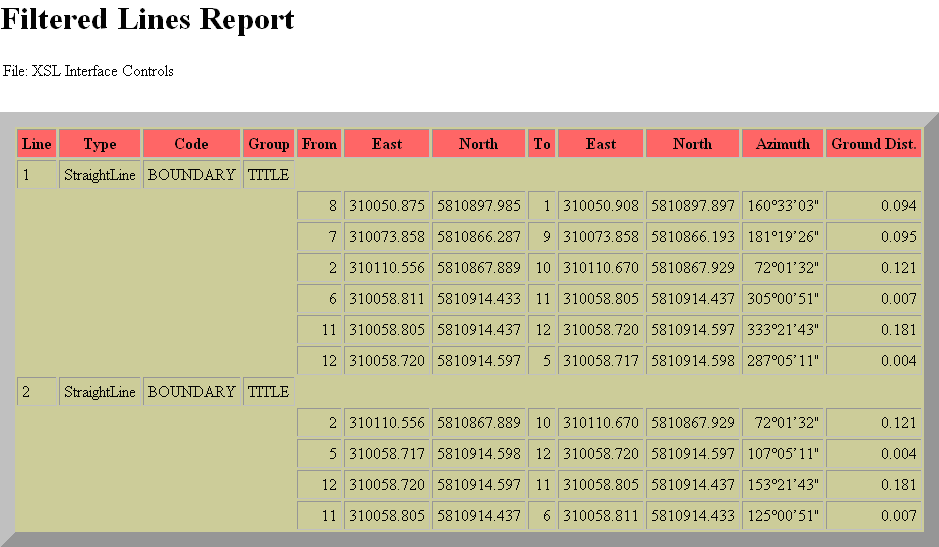
To see what we've done take effect though...
Select Tasks/Utilities, then Reports/XSL Parameter Controls Tutorial.
Enter the following at the prompts.

Click OK.
Enter the same file names that we did before and click OK.
We now have a report which outputs all Lines less than 50.267 metres long!
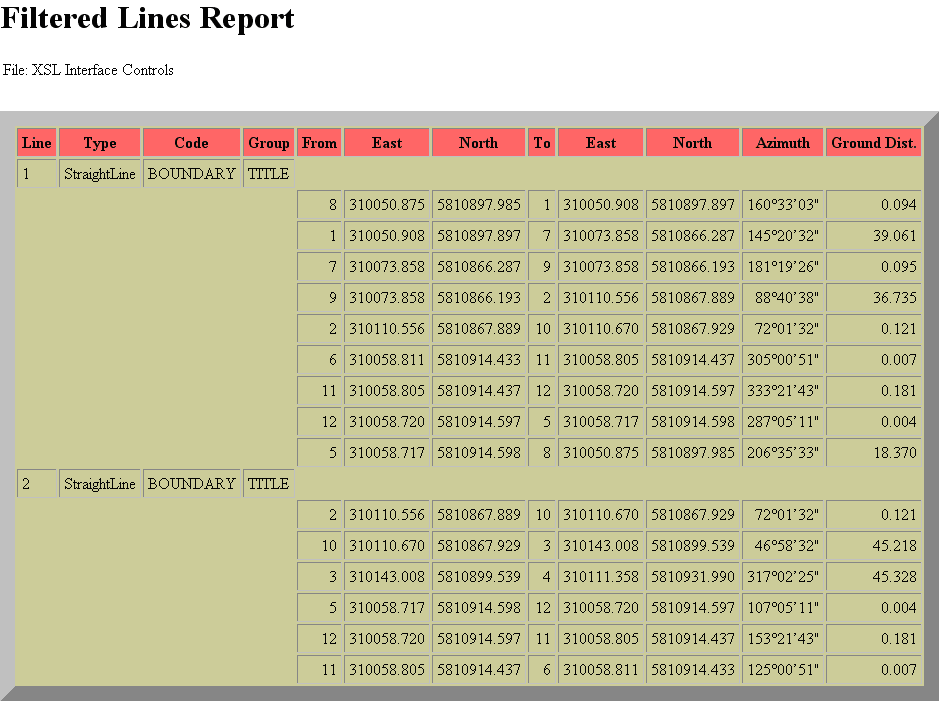
Feel free to experiment with different values for the maximum length and play around with the Line Filter.
This tutorial has provided a look at how the user can create parameter controls in LISCAD using XSL Style sheets. We have learnt how to allow the user to specify their own report criteria interactively, without having to modify code.
In the next tutorial "XSL Style Sheets - Tailored Input / Output" we will look at other options on what a style sheet can output. So far, we have just looked at outputting XML data to a HTML document. We will see that there are other useful formats that can be produced.
Conclusion
You have now completed the Tutorial on the XSL Style Sheets - Using Parameter Controls and should have a good understanding of the following:
- Different Types of Parameter Controls;
- Creating a Parameter Control in a dialog screen;
- The <Parameter....> element in LISCADXML-SEEDE-1.0 ;
- How to create XSL variables using the <xsl:variable> element.