To complete this tutorial you will require the Input / Output module.
Note: This tutorial cannot be completed using LISCAD Lite.
Aim
The aim of this tutorial is to continue the examination of XSL Style Sheets, in particular looking at how they can be used to import XML data into LISCAD and how to export formats other than HTML.
In this tutorial, we will look at style sheets that output to a text file instead of HTML, and another that outputs to another XML file. We will also look at importing various XML formats into LISCAD.
Before you begin
Select this button to install the required data files.
Text Output
- Run the Text Output Style Sheet
In LISCAD, Select File/Open and open the "LISCADXML Tutorial.see" file.
Select Tasks/Utilities, then Reports/XSL Text Output Tutorial. If this option is not available in the Reports Menu, use the Add/Remove function to add it to the list.
Enter the following into the prompts.

Click OK.
Enter the following at the prompts:
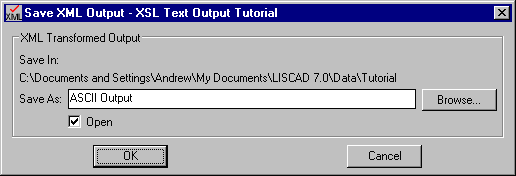
Click OK.

We get a text file "ASCII Output.txt" opened in Notepad, which shows us the Point Num, Symbol Sizes and Description of all points which have a code of FENCE. We call the file a comma delimited file, since the comma symbol is used to separate the data. The beauty of these types of files, is that they are typically easy to import into spreadsheet utilities such as Microsoft Excel.
So how did the style sheet manage to create a text file with commas separating the data?
- Review the Style Sheet
Open the "REP Text Output Tutorial.xsl" file in your style sheet editor, in this case Cooktop.

Note the <xsl:output....> element. In previous tutorials, the method attribute has been "html". In this case though, we designate the method to be "text".
Note now in the template that matches on "SEEDB", that there is another XSL element, the <xsl:text....> element. This element outputs as text everything that is enclosed within it.
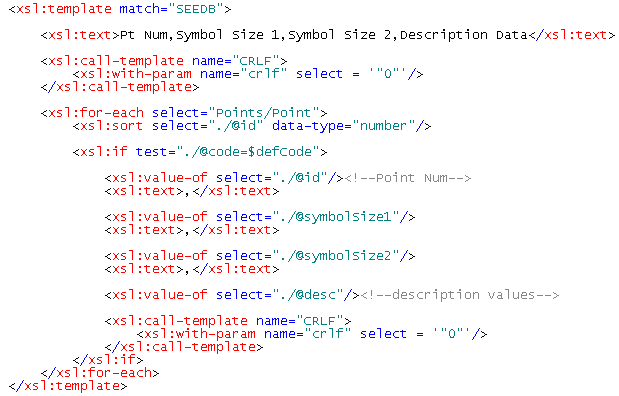
We also find that another template from the Helper Files has been called. The template "CRLF" is used to send a carriage return and line feed to the output text file, so that the next output will start on a new line.
Then we see that for every point, we are using the <xsl:for-each....> element to output all points whose Code we entered in the Parameter Control, sorted by Point ID.
We can see from this, how outputting the text files rather than HTML is quite a simple exercise.
XML Output
In the previous example, we saw how to output XML data to a text file by changing the method attribute of the <xsl:output....> element in the style sheet. Another option for the method attribute is "xml", which will output the data as an XML file.
You may be wondering why we would need to output to XML, when we already have XML data available in the LISCADXML file. Well it is important to understand that XML is used widely to exchange data, according to a schema. The LISCADXML-SEEDB-1.0 Schema, from which the LISCADXML file we produce from LISCAD is just one schema, created by the LISCAD development team. Other developers may quite easily have developed their own schemas, completely differently from LISCAD.
- Introducing LandXML
Indeed, over the last few years, there has been an attempt made to create a standard widely available schema to exchange Surveying and Engineering related information. This schema is called LandXML. For information about this schema, visit www.landxml.org.
As with all XML schemas though, it is composed of elements, attributes and values. So if we could transform the raw XML file that comes from a SEE database to an XML file that is based upon the LandXML schema, then the data in the SEE database suddenly becomes available to a wide community, the community that use LandXML as a data exchange.
LISCAD ships with some example Export style sheets that allow the user to export LISCADXML to LandXML. These style sheets are fairly complex though, so it is perhaps prudent to look at a component of the transformation to LandXML, rather than all of the style sheet. In this section of the tutorial, we shall look at an example LandXML file, and edit a style sheet to be used to output the SEE database we are using to a similar LandXML format.
Here is an example of a basic LandXML file.
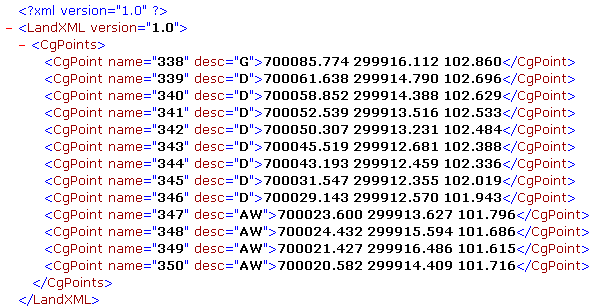
We can see that it has a root node of <LandXML....>, rather than <SEEDB....> and it has elements called <CgPoints>, which are basically the LISCADXML equivalent of <Points>.
Unlike the <Point..../> element in LISCADXML, there is no coords attribute, rather the coordinates of the <CgPoint....> element are stored as the actual value of the element, not as an attribute. Also, the coordinates are stored as Northing Easting Elevation, rather than LISCADXML's coords attribute which contains the Easting and Northing and the elevation attribute.
We will now investigate a style sheet that will create an XML file in a LandXML format, as above.
- Creating a basic LandXML File
Open the "DCE XSL Export Tutorial.xsl" file in your style sheet editor, in this case Cooktop.

Note the <xsl:output..../> element. In previous tutorials, the method attribute has been "html". In this case though, we designate the method to be "xml". We also find another attribute, the indent attribute. This attribute indicates whether the output should be indented according to its hierarchical structure. Setting it to "yes" means that the output XML should be easier to read.
Note the <operation..../> element. We wish to output all Points in the SEE database, but we only need to output the coordinates, the ID and the description of each Point, which are all core attributes. Our plan here, is to output the Point IDs as name attributes in LandXML, and the description attribute would match directly with the description attribute in LandXML.
Let's continue the analysis of this style sheet by looking at the template matching on the root element of the LISCADXML-SEEDB file, the <SEEDB....> element.
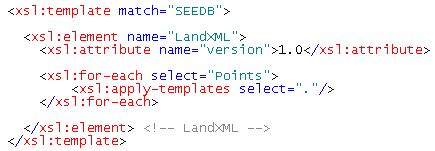
The second line is the interesting one, the one with the <xsl:element....>. This XSL element allows us to output XML elements themselves, so what we are saying here is output an element called "LandXML". This occurs in the template which matches the root element of the LISCADXML-SEEDB file, which will only occur once, at the start, so what is happening is that when the parser encounters the LISCADXML-SEEDB root node, the <LandXML....> element is output, and this element will be the root element of the LandXML output file.
The next line contains a <xsl:attribute....> element, which should be noted as being embedded within the <xsl:element....>. This attaches an attribute called version to the <LandXML....> element output, and gives this attribute a value = '1.0'.
The next bit of code is a <xsl:for-each....> block which will loop through all the <Points> elements in the LISCADXML-SEEDB file and apply any template that matches on "Points".
Now lets look at next template.
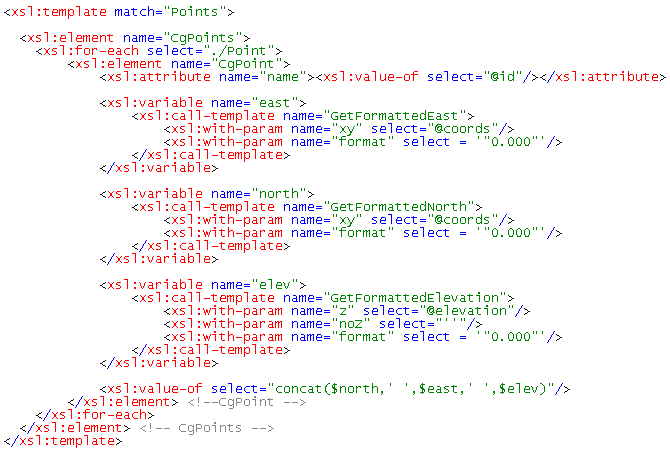
In this template, we immediately output an element called <CgPoints>, which is LandXML equivalent of the <Points> element in LISCADXML-SEEDB.
A <xsl:for-each....> element loops through all the LISCADXML-SEEDB <Point..../> elements, and outputs the LandXML <CgPoint....> equivalent element. We then output to the <CgPoint....> element, an attribute called name. We use an <xsl:value-of....> element to give this new name attribute the value of the id attribute of the LISCADXML-SEEDB <Point..../> element that is being processed.
We now need to deal with the co-ordinates of the points, remembering that we have to change the order of them in outputting to LandXML. The easiest way to do this is to create some style sheet variables which will store the easting, the northing and the elevation. We have already seen, in previous tutorials, how we can use a Helper File function to extract the easting and northing from the coords attribute and the elevation from the elevation attribute of a LISCADXML-SEEDB <Point..../> element, using the GetFormattedEast, GetFormattedNorth and GetFormattedElevation. So we use the <xsl:variable> element to set up a variable called "east". Embedded in this is the template call to GetFormattedEast . Because this call is enclosed by the <xsl:variable....> element, the output from this function will be stored in the "east" variable. The same applies to the "north" variable and the "elev" variable.
Note that if there is no elevation for the <Point..../>, then the function GetFormattedElevation will output an empty string.
Finally, we have a <xsl:value-of....> element. This outputs the value of concat($north, ' ', $east, ' ', $elev).
The concat(....) function is an XSL function used to concatenate strings together. We are asking the style sheet here to concatenate the value of the "north" variable with a space, then the value of the "east" variable with another space, then the value of the "elev" variable. This concatenated string becomes the value of the LandXML <CgPoint....> element.
- Review the Output
So let's run this style sheet and see what the results are.
In LISCAD, Select File/Open and open the "LISCADXML Tutorial.see" file.
Select Tasks/Data Conversions, then Export/XSL Export Tutorial. If this option is not available in the Export Menu, use the Add/Remove function to add it to the list.
Enter the following at the prompts:
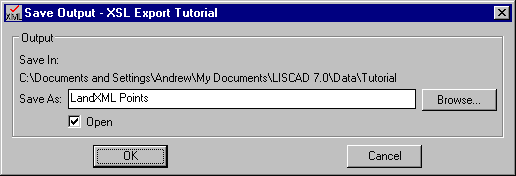
Click OK.
And there we are! A LandXML XML file is output, for each point in the SEE database.
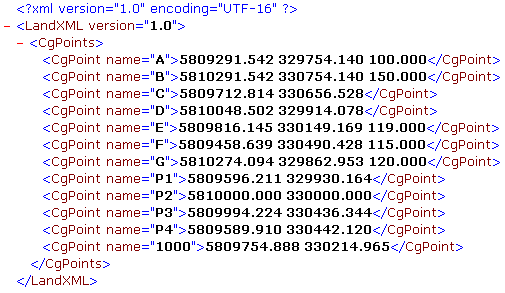
Note that we have a <LandXML....>root node, with a <CgPoints> node and a series of <CgPoint....> elements. The northing is first, then the easting, followed by the elevation if the point has one. You may notice though, that we appear to have forgotten something. Where is the desc attribute for those points?
- Output the Point Descriptions
We shall now edit the style sheet to include the desc attribute.
If the style sheet is closed, open the "DCE XSL Export Tutorial.xsl" file in your style sheet editor, in this case Cooktop.
Scroll down the code until you get to the template that matches on "Points". We need to add an attribute called "desc" for each LandXML <CgPoint....> element and the value of this attribute will be the value of the "desc" attribute for LISCADXML-SEEDB <Point..../> element being processed.
Add the following code line, after the code line that adds the name attribute.
<xsl:attribute name="'desc'"><xsl:value-of select="'./@desc'"/></xsl:attribute>
Thus...

Save the style sheet and re-run the style sheet as you did previously.
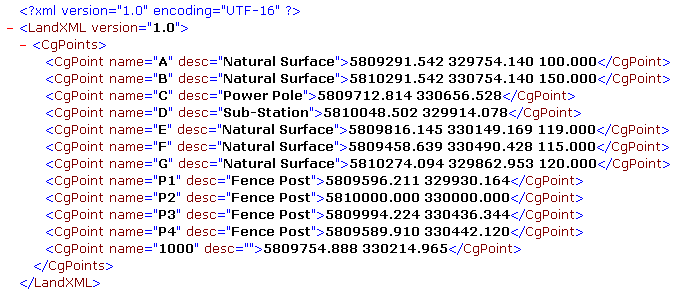
And there we are! A LandXML XML file is output, with the desc attribute included, for each point in the SEE database.
- Some Other LandXML Elements
It is important to remember that this exercise just looked at exporting Point data from SEE to LandXML. LandXML has many other entities which match SEE entities too, for example, a <Polygon..../> element in SEE matches with a <Parcel....> element in LandXML. The user is reminded that there is an example Export style sheet included with LISCAD that will export most SEE entities to the closest matching LandXML entity.
Another important thing to be aware of is that LandXML is such a vast schema, that many companies using it interpret the use of its elements differently. As a simple example, there is more than just a match between a <Point..../>, as known with LISCAD and <CgPoint....> within LandXML. There is also an element within LandXML called <Monument....> which could just as easily match the LISCAD conceptual <Point..../> element.
This means that developing a style sheet to output LandXML elements from LISCAD might work for one 'flavour' of LandXML, used by Company A, but it may not work for the 'flavour' of LandXML used by Company B. The user therefore requires knowledge of style sheet editing in order to modify style sheets appropriately, a requirement these tutorials are attempting to fulfil.
XML Input
We have just seen how it is possible to export other XML schema elements from LISCAD by developing a style sheet to do this, and we used the LandXML schema as an example. We saw how by using <xsl:element....> and <xsl:attribute....> we could convert LISCADXML-SEEDB to LandXML, by matching entities in LISCADXML-SEEDB, particularly the <Point..../> element, converting it to <CgPoint....>.
It is just as easy to go the other way. If we were sent a LandXML file containing a list of <CgPoint....> elements, like the one we just output, then we could import this data into LISCAD by writing a style sheet that converted those <CgPoint....> elements to <Point..../> elements and LISCAD would be able to create the SEE database file from the XML elements it knows about.
Because it is reasonably trivial to just look at Points, we shall look at a more complicated style sheet, which will also import a Model, from a LandXML file, which will show us some corresponding LandXML elements for these LISCAD entities.
- Understanding the Relationship Between Models in LISCADXML
and LandXML
Open up the file "XSL Import Tutorial.xml" in your Web browser. This file can be found in your Tutorial Data Folder.
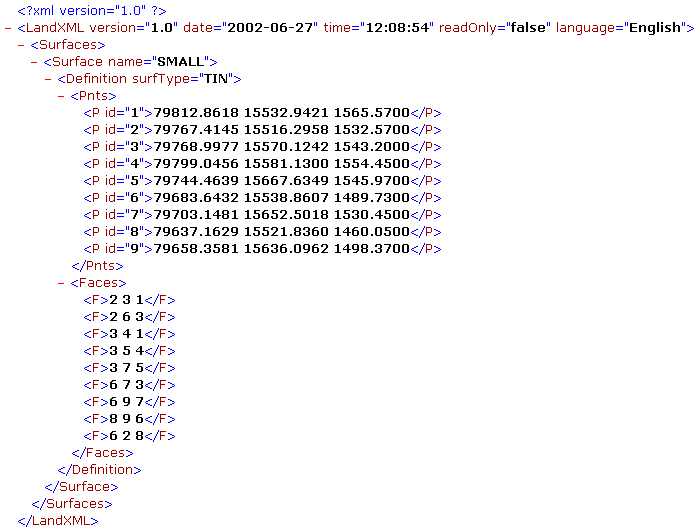
This is an example of a LandXML file that contains XML data that defines a surface, or a Model in SEE. In LandXML, a surface consists of a series of Points, defined using the <P....> element - another example of an element that can match the LISCADXML-SEEDB <Point..../> element - and a series of Faces, defined using the <F> element. The value of an <F> element is the three point numbers that define the face (or triangle).
To see how this compares with the LISCADXML-SEEDB-1.0 definition of a Model, let's open up the LISCADXML schema.
You can find the "LISCADXML-SEEDB-1.0.html" file on the LISCAD installation CD in the "XML Documentation" folder, or it can be downloaded from the LISCAD web site at http://www.listech.com/liscad/library.aspx?library=miscellaneous.
Open the "LISCADXML-SEEDB-1.0.html" file by double clicking on it. It should open automatically in your default web browser. This file contains links between the elements in the LISCADXML-SEEDB-1.0 file making it quicker and easier to locate the information
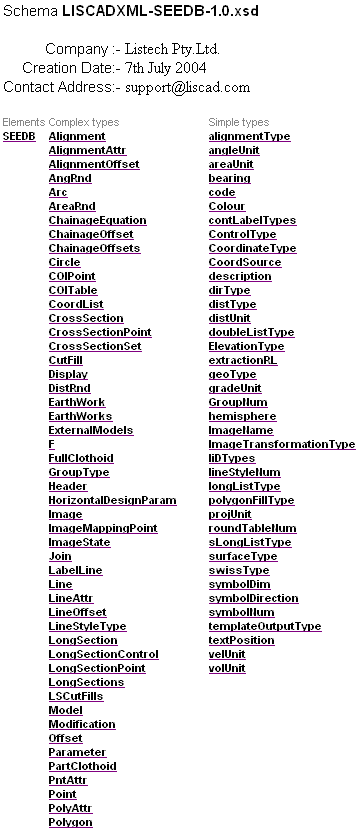
Click on the SEEDB link.
Click on the Models link.
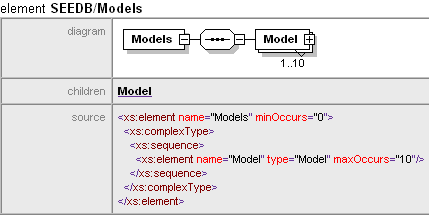
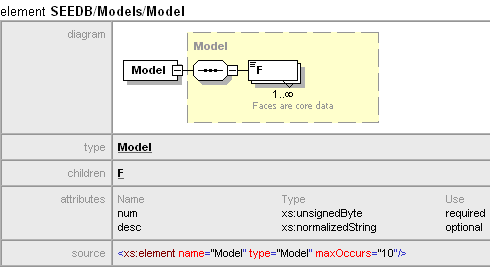
In LISCADXML-SEEDB, we have a <Models> element, which has a child element of <Model..../>, which has a child element of <F..../>. So we can conclude that the <Surfaces> element in LandXML would match the <Models> element in LISCADXML-SEEDB; the <Surface....> element in LandXML matches the <Model..../> element in LISCADXML-SEEDB; the <F..../> element in LandXML matches the <F..../> element in LISCADXML-SEEDB.
So what values does the <F..../> element in LISCADXML-SEEDB contain? Is it, as is the case with LandXML, three point numbers?
Click the F link.
Click the type F link.

Referring to the text in the diagram, this says the F type of element contains 3 point numbers, which must exist in the SEEDB parent. Hence we can see that like the LandXML equivalent, the LISCADXML-SEEDB <F..../> element will contain three point numbers as a value.
There is a difference though. Whereas in LandXML, we have a list of Points, <Pnts> and <P....>, defined within the <Surface....> element, there is no such equivalent in LISCADXML-SEEDB. We conclude then that the <P..../> elements match the <Point..../> element in LISCADXML-SEEDB and the num attributes of the <Point..../> elements will be stored in the <F..../> elements.
- Creating a LandXML Surface
Based upon the above transformation requirements, we can now construct a simple style sheet that will perform this transformation for us.
Open your XSL editor, in this case Cooktop, and open the style sheet called "DCI XSL Import Tutorial.xsl".

At the top of the style sheet we have the parser instructions, and the <xsl:stylesheet....> declaration. The output method is "xml", of course. We also wish to use the templates in the "HLP GeneralUtilities01.xslt" Helper File. This is followed by the name that appears on the LISCAD menu.
The next block is the template that matches on the root node of the XML file. As you should be aware, this is the first element that the parser will encounter, so it will be the first transformation done. Hence we need to output the LISCADXML-SEEDB root node, the <SEEDB> element.
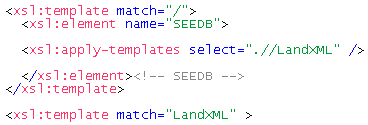
You would expect the root node of the XML file we are transforming, the LandXML file, to be <LandXML>, and normally you would be right. Some LandXML users however, seem to embed the <LandXML> element within some other elements, unrelated to LandXML, so you need to be careful about it. For this reason, we have an apply-templates element which will look for <LandXML> elements and continue from there.
Next follows the template which will match on "LandXML", the one the apply-templates element above will call.
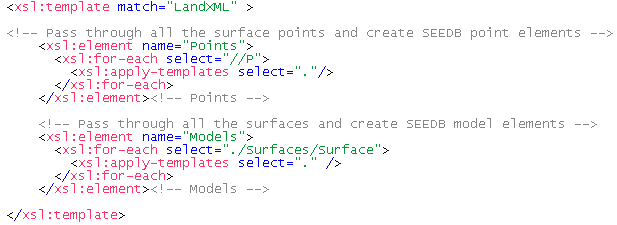
This template creates the <Points> element and the <Models> element for the LISCADXML-SEEDB file created, since they are the immediate children of the <SEEDB> element.
First, the <Points> element is output which calls a template for everywhere we find a LandXML <P....> element, in which we will output the <Point..../> elements. Then the <Models> element calls a template for everywhere we find the LandXML <Surface> element, in which we will output the <Model..../> elements.
Now we shall look at the template that matches the <P....> element, the one that will output the <Point..../> element, called by the first apply-templates element in the above code.
The value of every <P....> element is a set of coordinates, of which Northing is first, then Easting, then Elevation. This is the convention for LandXML coordinate elements. We will need to extract out the coordinates and then create a <Point..../> element which has a coords attribute with the Easting first, then Northing, then Elevation. Because the process of creating a <Point..../> element is something that could be used by other templates at some stage, perhaps it would be good to create a separate template which will create a <Point..../> element, using say parameters passed to it as the point attributes.

There are a couple of functions in this template that may be unfamiliar. The normalize-space() function will strip leading and trailing spaces from the string passed to it. Thus normalize-space(.) will strip leading and trailing spaces from the coordinate list which is the value of the <P....> element. The substring-before() function will return part of a given string before a specified character is found. Look at the first line.
"substring-before(normalize-space(.),' ') means to return the part of the co-ordinate list before the first space is encountered. Say the co-ordinate list for the <P....> element was 3000.000 4000.000 50.000
The substring-before() function would return 3000.000, since that is the part of the string before the first space.
The substring-after() function will return part of a given string after a specified character is found. Using the same scenario above, this would return 4000.000 50.000 since this is the part of the string after the first space.
If you follow the first four variable declarations though, the following values will be assigned to the variables, based upon the example coordinate list above.
Variable value pointY 3000.000 xy 4000.000 50.000 pointX 4000.000 zPlus 50.000 Thus "pointY" stores the Northing, "pointX" stores the Easting, and "zPlus" stores the elevation.
Next the "CreateSEEDBPointElement" is called, which obviously creates a SEEDB <Point..../> element, passing the following parameters to it - "num", "id", "east", "north" and "elevation". You may be unaware what the generate-id() function does. This function returns a value that uniquely identifies the node passed to it.
The next template is the template that creates the SEEDB <Point..../> element.
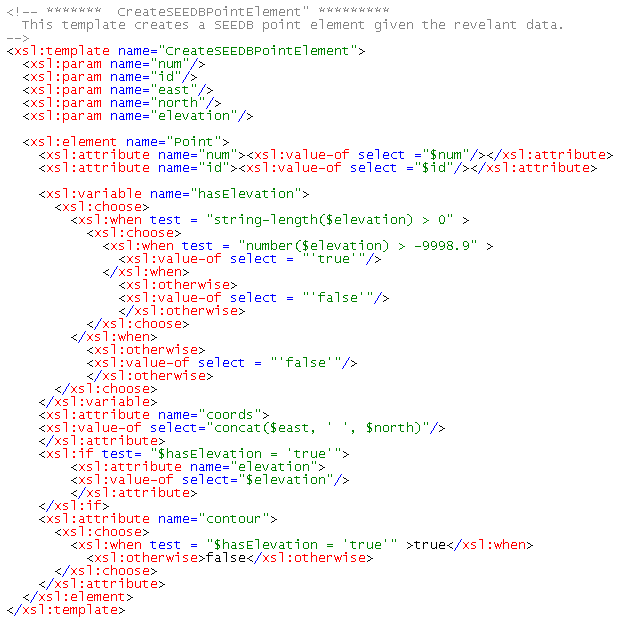
This template will output the <Point..../> element and some of its attributes.
The "num" and "id" attributes are given the values of the num and id parameter passed to the template.
Then we are creating a variable called "hasElevation" which we use to test whether a valid elevation value has been passed to the template. Elevations are particularly important for surface modelling, so we want to ensure that no bogus elevations are passed in. The code block embedded in the "hasElevation" variable will test whether the elevation parameter passed to the template is firstly not a zero length string and secondly is above the value -9998.9, a value chosen because LISCAD considers it too low for a valid elevation. If it passes those two tests, then the "hasElevation" variable is 'true', else it is 'false'.
The "coords" attribute is output next. If "hasElevation" is true, we output the elevation value as well. Note that now easting is output before northing, as is the convention in LISCADXML-SEEDB.
Finally, the "contour" attribute, i.e. whether a point is contourable, is output. This is equal to the value of the "hasElevation" variable.
Next follows the template that matches on "Surface" and will output the <Model..../> elements. This template will need to output a num attribute for each <Model..../> element, since this is a required attribute, according to the LISCADXML-SEEDB-1.0 documentation. We can use the generate-id() function to assign a unique number to it. We will add a "desc" attribute to it, with the value of the <Surface> "name" attribute as its value.
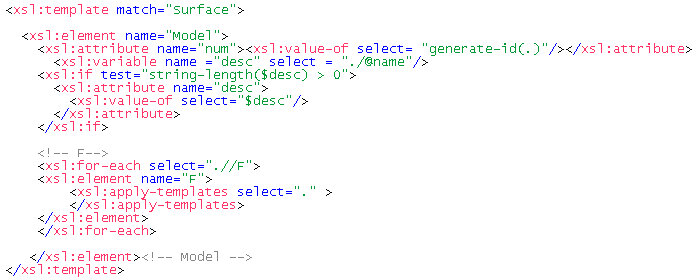
Then we need to output the LISCADXML-SEEDB <F..../> elements as children elements of the <Model..../> element, so we call a template to match on each of the LandXML <F..../> elements.
The last template we need to add is the one which matches on the LandXML <F..../> element and is called as each LISCADXML-SEEDB <F..../> element is output to LISCADXML-SEEDB.
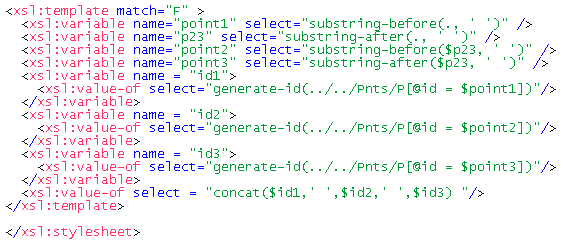
This template is similar to the one earlier matching on "P", in that it extracts the three Point numbers that the <F..../> element's value contains. These three point numbers are stored in variables "point1", "point2" and "point3". Then variables are created called "id1", "id2" and "id3" which will store the id of the LandXML <P> element which has an id attribute equal to the value in the corresponding 'point' variables.
The value of the LISCADXML-SEEDB <F..../> element becomes equal to the three id variables concatenated together and separated with a space.
Now close the style sheet and lets see what it does. - Import the LandXML Surface into LISCAD as a Model
In LISCAD, Select File/New and create a new file called "XSL Tailored Input.see". The Projection type should be Plane.
Select Tasks/Data Conversions, then Import/XSL Import Tutorial. If this option is not available in the Import Menu, use the Add/Remove function to add it to the list
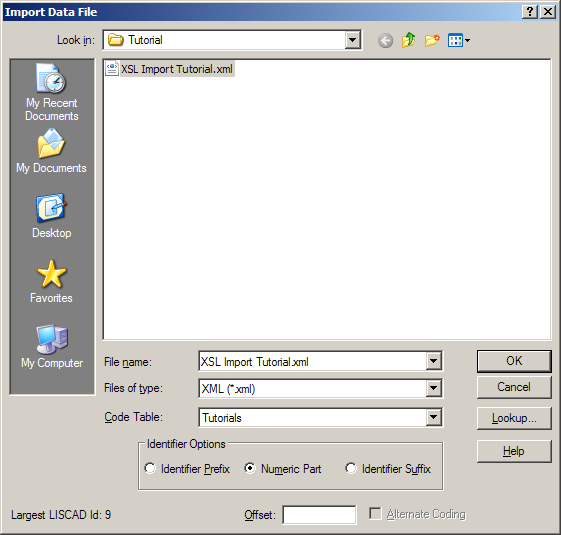
Select File "XSL Import Tutorial.xml", and ensure Files of type XML is selected. Select the Tutorials Code Table and click on OK.
The size of the LandXML file is small, so the import should happen very quickly. You may notice the progress dialog, indicating the system is busy, but once it closes you should get a message to say the file has been successfully imported.
Do a Fit on the File.
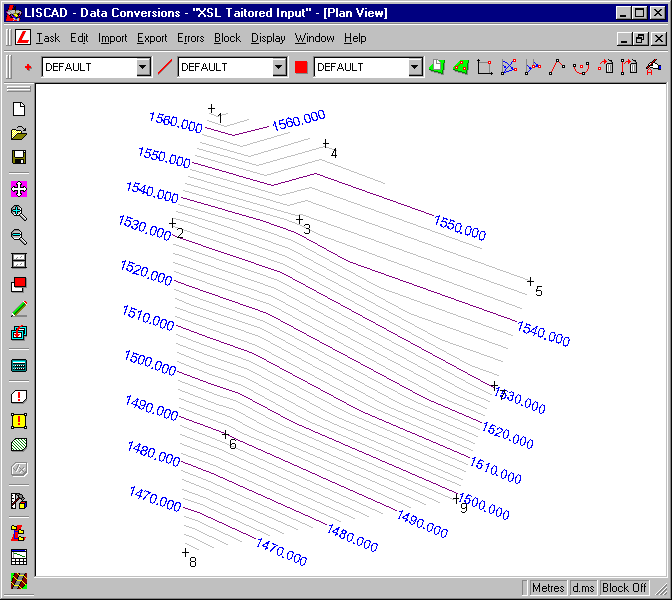
The file may appear blank, but select Display/Features. In the Points tab, ensure the Symbol and Crosses are ticked. In the Model tab, click on Model number, and if everything has be coded correctly, there should be one model available, number 1. Select this, and tick Contours. Then turn on values for Contour Labels, and Display Along Contour.
Click OK.
Now the Model should be displayed, with 9 points all nicely contoured.
This tutorial has provided a look at how XML can be used to import and export data between other systems. We saw how we could export to a text file and another XML document, and how we can import data from an XML file into SEE.
Conclusion
You have now completed the Tutorial on the XSL Style Sheets - Tailored Input/Output and should have a good understanding of the following:
- Exporting XML data to a text file;
- Exporting XML data to other XML schema files (LandXML);
- Importing XML data from a foreign schema (LandXML) into SEE;
- Some further XSL functions, namely substring-before(), substring-after(), normalize-space() and generate-id().