To complete this tutorial you will require the Survey Live module.
Note: This tutorial cannot be completed using LISCAD Lite.
Aim
The aim of this tutorial is to demonstrate how to use Survey Live to do a real time survey in both Total Station and GNSS modes, but without the need to actually connect with a total station or GNSS sensor.
Instead of the survey observations coming from a sensor, they instead come from prepared demonstration data files.
Scenario
There are two adjoining properties for which your client requires a title reestablishment and detail survey. You have obtained title details and dimensions from the relevant authorities and created the required title boundary points and lines in a LISCAD SEE project. You can now simulate visiting the site equipped with LISCAD Survey Live software and appropriate GNSS and/or Total Station equipment, ready to perform the survey.
Before you begin
Select this button to install the required data files.
- Open the SEE project file , run Survey Live and configure it for demonstration mode
- Perform a Setup for Total Station mode (If in GNSS mode,
skip Step 2 and go to Step 3 )
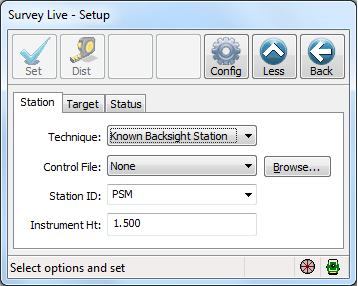
Select the Setup button. On the Station page make selections as shown below. Note that you can select the Station ID from the screen or from the list.
On the Target page make selections as shown below. Note that you can select the Backsight ID from the screen or from the list.
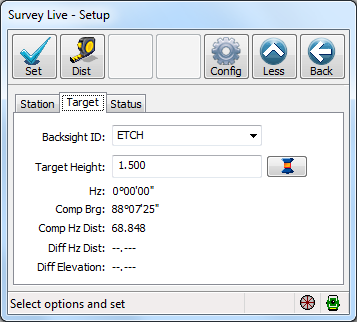
Select the Dist button to take a measurement from PSM to Etch and note acceptable Diff... values of -0.004 and 0.007 to the computed values.
Select the Set button to save the Setup and return control to the Survey Live main command page.
You will note that because there is now a valid setup, the Survey and Setout activities are now also available.
- Perform a Setup for GNSS mode (Skip Step 3 if in
Total Station mode)
Select the Configure button and then the Quality page. Make selections as shown below. These settings mean that using the Meas button in GNSS mode will also automatically stop measuring and store once required accuracy is achieved. (i.e. no need to use Stop and Store buttons).
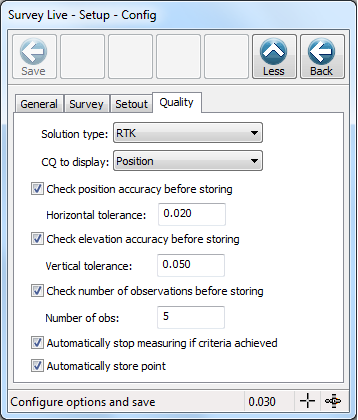
Select the Save button to save the settings and return control to the Survey Live main command page.
Select the Setup button. On the Transformation page make selections as shown below. Note you need to key in a Transformation name.
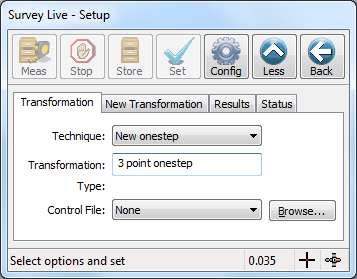
On the New Transformation page make selections as shown below. Select the Meas button to initiate and show the measurement to PSM.
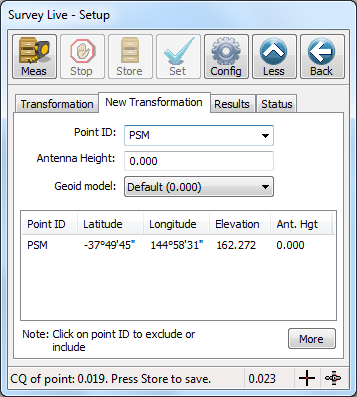
Select ETCH as the next Point ID and again select the Meas button to take and show the measurement.
Select PSM2 as the next Point ID and again select the Meas button to take and Show the measurement.
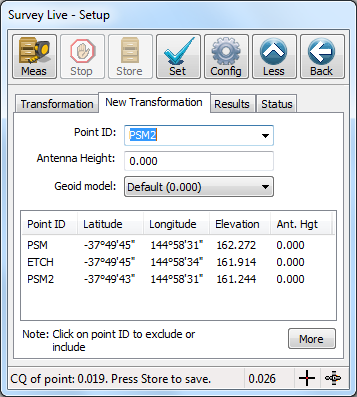
A transformation solution is automatically calculated when sufficient observations are available. Select the More button to see the differences in coordinates between the known positions of the observed control points and the positions computed via the transformation solution.
Select the Results page to inspect the transformation parameters.
Select the Set button to save the transformation as the current GNSS setup and return control to the Survey Live main command page.
You will note that because there is now a valid setup, the Survey and Setout activities are now also available.
-
Perform the Detail Survey
Note: The pictures for the balance of this tutorial are for Total Station mode. If you are in GNSS mode, you will notice some slight differences between your dialogs and the pictures here, but the settings are all the same, with the exception that Antenna height should be set to zero if in GNSS mode.
Select the Survey button and make the following settings in the Coding page. Note that a selection in the Feature Code field automatically sets that feature code for both points and lines. Otherwise they can be set separately using the buttons.
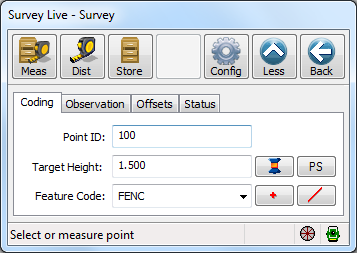
Select the Meas button 4 times to take measurements to fence corners on the northern and eastern sides of the property. Note that the new points and lines with the correct line style are automatically created based on the code table settings for code FENC.
Change the Feature Code to TPEG.
Select the Meas button 3 times to take measurements to pegs found on the street boundary. Note that the new points with the correct symbol are automatically created based on the code table settings for codeTPEG.
Select the Config button. Make the following settings in the Survey page.
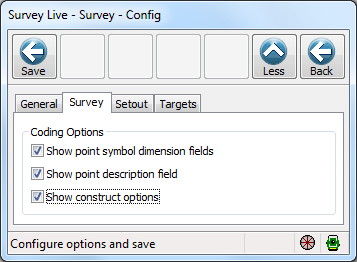
Select Save to return to the Coding page. Note that additional fields have become available. Make selections as shown below.
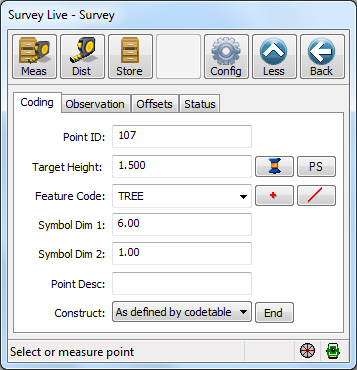
Select Dist then Store to simulate a split observation to the tree.
Change Symbol Dim 1 to 10 and Sym Dim 2 to 1.5.
Select Dist then Store to simulate a split observation to another tree.
Repeat Dist then Store to observe the final tree.
Change the Feature Code to NS and select Meas three times to complete the survey with some natural surface observations.
Form a model and display the contours in the usual manner. Perform and other LISCAD functions you desire. A picture of the finished survey is shown below modelled with 0.2 metre contours shown.
Run SEE, select File/Open and open the file called Survey Live.see located in the Tutorial folder.

Select Task/Survey Live/Survey Live to display the Survey Live dialog.
You will note that you cannot access the Setup, Survey or Setout activities at this stage as no sensor has yet been configured.
In the Survey Live dialog, select the Configure button and then the Sensor page. Make selections as shown in one of the pictures below, depending on whether you prefer Total Station or GNSS sensor type.
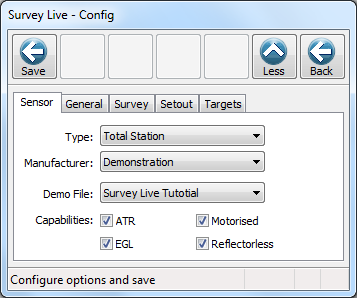 OR
OR
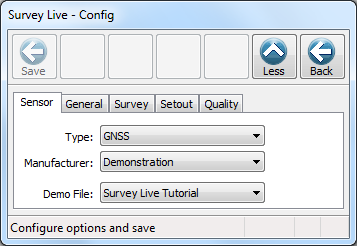
Select the Save button to return to the main Survey Live menu.
You will note that because a sensor is now configured, the Setup button has become available. A sensor Setup is naturally required before the Survey or Setout activities can also become available.
Conclusion
You have now completed the Survey Live Tutorial and should have a good understanding of using Survey Live to perform a survey using total station or GNSS. The tutorial has explored only a small part of the functionality and you are encouraged to explore all the other options of Survey Live not covered above. Please refer to the context sensitive help for detailed explanation of all options.
To configure Survey Live for real world use with a Total Station and GNSS sensor, please also refer to the Survey Live Communications help topic.
