To complete this tutorial you will require the Input/Output and Computations modules.
Aim
The aim of this tutorial is to show you how to import data from various systems into LISCAD. You will learn how to:
Import the data using the correct Code Table
Display the relevant information for the points imported
Edit various point attributes
Typical Scenario
GPS data has been collected with a Leica GPS System and processed by SKI or SKI-Pro, from which a SKI ASCII format co-ordinate file "Leica.asc" has been produced. This file is to be imported into LISCAD and used as control for further data collected by a total station.
Note:
Leica GPS System 300, when used in real time, can produce a LISCAD raw file (*.raw) containing co-ordinates, which can be converted to a LISCAD field file via Field Transfer/Resolve/Create Field File and then brought into the LISCAD project using Field Transfer/Resolve/Reduce Field File.
Leica GPS System 500, when used in real time, can produce a LISCAD field file (*.fld) containing co-ordinates, which can then be brought into a LISCAD project using Field Transfer/Resolve/Reduce Field File.
Before you begin
Select this button to install the required data files.
Now proceed with the steps below.
- Import GPS Data
Select File/Open and open the file called "Importing GPS.see" in the Tutorial folder.
Select Task / Data Conversions
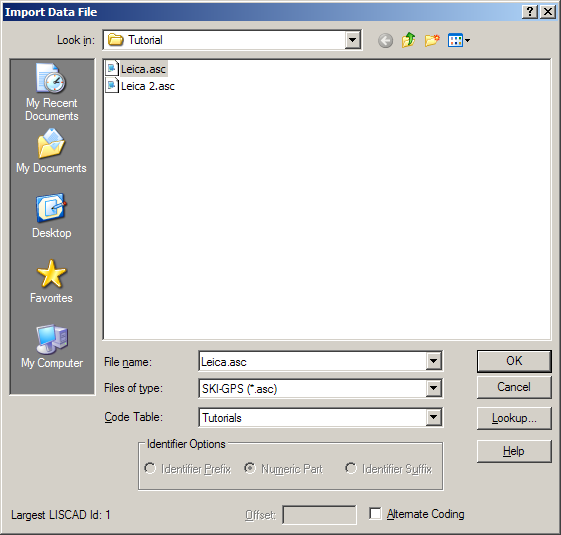
Select Import/SKI-GPS.
Note: If SKI-GPS does not appear on the Import menu, select Import / Add/Remove and select SKI-GPS from the Available list by double clicking on it to add it to the Installed list. Close the Add/Remove dialog box and SKI-GPS will now appear on the Import menu.

Use the Code Table field to select the "Tutorials" code table, as this code table contains the codes that were used when the GPS data was collected.
Click on the file "Leica.asc" in the Tutorial folder, to place it in the File name field. This is the file that contains Leica GPS data.
Click OK to import the GPS data that you will see on the screen.
- Set-up the Display
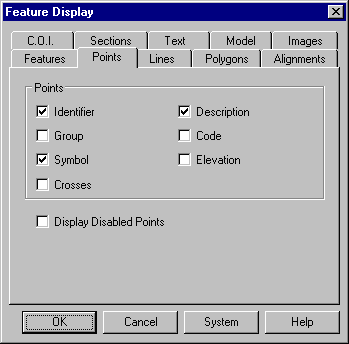
Select Display / Features and then the Points tab. Ensure that you have the Identifier, Description, and Symbol check boxes selected as shown below. Then select OK. Note that you will now see these attributes in the graphics window.
Tip: You can quickly show the Display Features dialog by right clicking anywhere on the screen, provided that no other function is active, and selecting it from the floating menu.

- Edit Point Attributes
When the survey was undertaken an incorrect code was used on a couple of points. We will now correct this mistake.
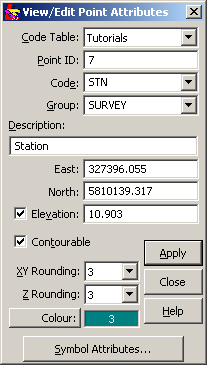
Select Task/Computations. Then select the Edit/View/Edit/Points command to display the dialog below and change the attributes of points 7 as described.

Click in the Point ID field and then snap to point 7 in the graphics window. Note that all of that point's attributes are then shown in the dialog.
This point was collected with the wrong code, so use the Code field to select the code STN thereby correcting this.
Also to give the point a more meaningful description, edit the Description field to be "Station 7".
Select Apply to save the attribute changes for point 7.
In a similar manner, also change the code and description for point 3, and the description only for points 1 and 2. Then close the dialog.

Conclusion
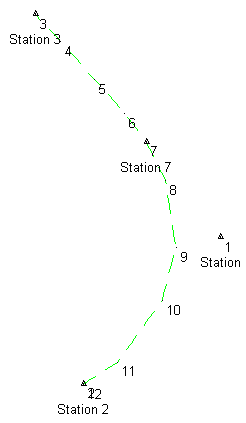
You have now completed this tutorial and should have a good understanding of how to import data, and control the attributes of the incoming data by using an appropriate code table. Your data should appear as shown here.
You have also learnt how to:
- Control the display of point attributes.
- View/Edit the attributes.