To complete this tutorial you will require the Profiles
& Design module.
Note: This tutorial cannot be completed using LISCAD Lite.
Aim
The aim of this tutorial is to define and compute the end area volumes of displayed cross section sets.
Before you begin
Select this button to install the required data files.
- Define the Cross Section Sets to Use that will Define the
End Areas
Select File/Open and open the file called "End Area Volumes.see".
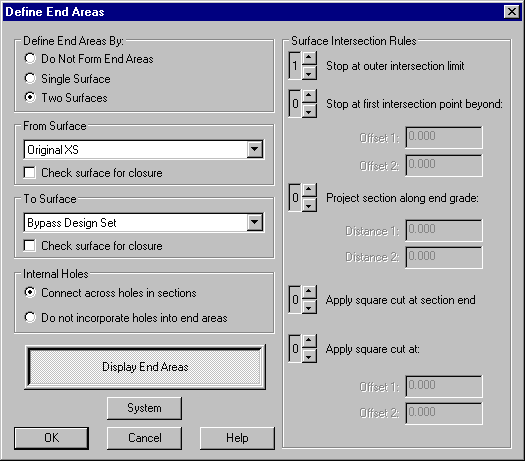
Click on Window/Cross Section View to open the Cross Section View.Select Volumes/Define End Areas command. This command displays the Define End Areas dialog box.

This dialog box is used to establish:
- Whether or not a closed surface or a two section end area determination is to be performed;
- Which sections are to be used in the determination of the end area;
- Whether holes in a section surface should be treated as if they were connected by line segments;
- Which rules are to be applied to define the outer extents of the end area intersections and the order in which these rules are to be applied.
Please select Two Surfaces to be used for the determination of end areas i.e. Design & Original Surface.
In the From Surface drop list select the Original surface cross section set "OriginalXS".
In the To Surface list select the Design cross section set "Bypass Design Set".
Note: When computing end areas using two surfaces if the "to" surface is above the "from" surface the area contained is classified as fill. If the "to" surface is below the "from" surface the area contained is classified as cut.
- Define the Surface Intersection Rules
Rules are used to determine how the outer extremities of the end areas are to be defined. One or more of these rules can be selected and the order of priority in which they are to be applied.
- A rule is set to 0 if it is to be disabled.
- At least one rule must be set.
- The number indicates the order in which a rule will be applied.
- When the rules are applied they are applied independently to the left and right sides of the cross section surfaces.
If it is not possible to find a rule that complies then no end areas will be created.
By only setting the surface intersection rule to Stop at outer intersection limit means that the end areas will be defined by the intersections between the two surfaces furthest to the left and right. Unless there are at least two intersections between the two surfaces no end area will be defined as no other rules have been implemented in this case.
Now make sure the Display End Areas button is depressed.
Select OK to exit the Define End Areas dialog and return to the Cross Section view.
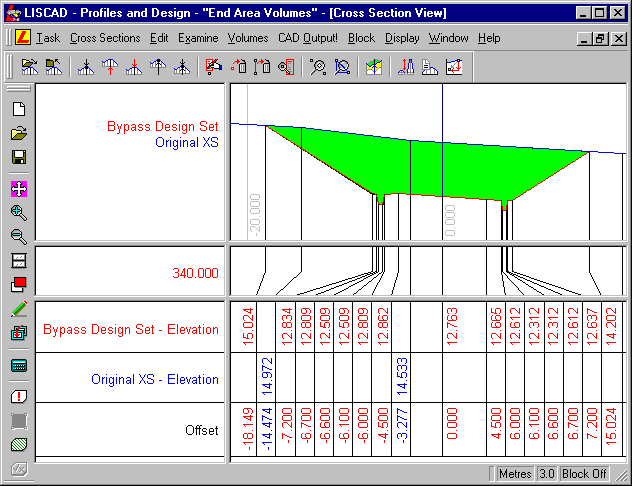
This now Displays the end areas.
This display option can also be toggled off or on by selecting Display/End Areas command in the cross section view.
Tip: You can quickly toggle the display of end areas by right clicking anywhere on the screen and selecting it from the floating menu.


Above is a typical Profile in Cut.
- Compute a Volume From the End Areas
The next task is to compute a two surface end area volume between the nominated chainages.
The volume computation will always include the prismoidal and centroid correction and is computed between each successive pair of sections where the end area can be determined. If the end area cannot be formed the section will be ignored and the next section will be used instead. Whenever a cross section is skipped because the end area cannot be computed it will be reported at the end of the volume report.
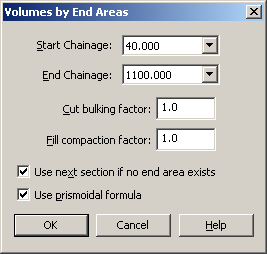
Select Volumes/Volumes by End Areas command. This command is only enabled if the user has successfully defined a two section end area.

Please make the necessary changes as displayed in the graphic above and select OK to compute a two surface end area volume between the nominated chainages.
A volume report is now displayed.
Conclusion
You have now completed this tutorial and should have a good understanding of how to define and compute the end area volumes of displayed cross section sets