| Availability: |
Computations module. |
| Menu Selection: |
From the Computations task, select the Edit command, the
Polygon by Area command followed by the Pivot Point command. |
| Functionality: |
Modifies the area of an existing polygon by rotating a selected
line about one of its ends. The line can only be selected by using the
mouse. |
| Information Controls: |
- Line Number - Displays the line number of
the selected line that will be rotated to alter the polygons area.
- Pivot Point - Displays the identifier of the
point about which the line will be rotated.
- Polygon Number - Displays the number of the
selected polygon.
- Description - Displays the description of
the selected polygon if it has one.
- Area - Displays the current area of the selected
polygon.
|
| Data Entry Controls: |
- New Area - Enter the required area for the
polygon. [Keyboard Entry only].
|
| Actions: |
- The Apply Button pivots the selected
line to change the polygon to the specified area.
|
| Notes: |
- This dialog has been designed to provide
the desired outcome with minimal input. The input focus is always
on the New Area control so that you can enter an area at
any time as well as using the mouse to snap/accept the pivot point,
the desired line, and the polygon all in one action.
- The pivot point selected will be the end point
of the line closest to where you have snapped/accepted the line.
- If the selected line is contained in more
than one polygon, simply re-select the line again until the desired
polygon is selected as well.
- The selected line and pivot point will remain
highlighted until an Action is performed.
- The selected line MUST be a single
line, NOT part of a line string.
- The selected line can be adjacent to an arc.
|
| WARNING: |
- This computation actually moves the end
point of the selected line and as a result, any objects attached
to that point will also be altered. This operation may cause
unexpected results and care should be taken if the moved
point lies on a boundary line.
If for example, the moved point was on the bend of a road frontage,
this operation will cause the road alignment to be changed and road
widths will no longer be maintained.
|
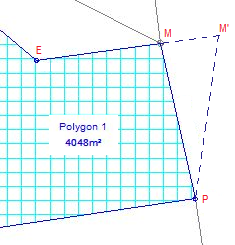
| Theory: |
- In the image below the Pivot Point (P),
Pivot Line (P to M), and the 'New Area' of 5000m2 is selected
via the dialog.
- SEE then iterates the position of the Move Point
(M) away from the End Point (E) along the 'Move Line' bearing and calculates an area at position M'.
- If the calculated area is within the required precision of the
'New Area' of 5000m2 then a result has been reached and M will be moved to M' and the polygon updated accordingly.
- If the calculated area is not within the required precision of the
'New Area', then SEE will iterate again to try and reach the required area.
- The precision used is as set in
Task/Utilities/Configure/Areas.
- Please note that if the 'New Area' can not
be gained by using the current 'Criteria' (the selected Pivot
Point, Pivot Line, New Area and Area Precision), then this
will be shown via a warning message.
|